Numerical control punch is a kind of equipment that automatically blanking the sheet metal according to the pre-programmed processing program.
The reasonable use method should not only ensure the processing of qualified parts that meet the design requirements, but also enable the reasonable application of CNC punch and give full play to its performance.
In the process of using CNC punch, every enterprise has its own methods to better maintain the equipment.
The following are the reasonable use methods of CNC punch summarized by our company according to many years of sheet metal processing experience.

Operation specification
The processing of sheet metal parts is inseparable from NC punching technology, and the correct operation specification of NC punching can not only make the processing smooth, but also maximize the utilization efficiency of the machine tool and greatly prolong the service life.
The following are our operating specifications:
(1) Before using the CNC punch, remove objects that hinder safety or work from the work area
(2) Close the air compressor vent valve and turn on the power supply of the air compressor.
(3) Clean the table, turn on the power supply of the main engine, check whether there is abnormal sound and abnormal state in the running state of the empty machine, and check the air pressure
(4) Input the drawing making program and confirm that the tool device required for this drawing is appropriate.
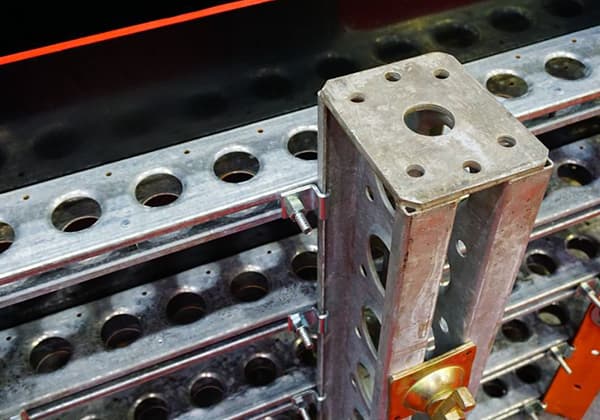
(5) When preparing the tool,
1. Select the most suitable tool size.
2. Correct the mold.
3. Determine the lower die clearance.
- When the plate thickness is less than 1.2t, and the gap is 0.2mm;
- When the plate thickness is 15t ~ 1.6, the gap is 0.3mm;
- When the plate thickness is 2.0T, the gap is 0.4mm;
- When the plate thickness is 2.3t, the gap is 0.5mm;
- When the plate thickness is 3.0T, the gap is 0.6mm;
- When the plate thickness is 4.0t, the gap is 0.8mm;
- When the plate thickness is 4.5t, the gap is 0.9mm;
If the material becomes aluminum or copper, the gap shall be added one level.
If there is no tool used above, it shall not be punched in principle. If it is urgent, the next level standard can be used.
4. Measure the length of the upper die and determine the tool loading position (standard length: 74mm, oblique knife: 77mm).
5. Determine the lower die thickness, 30 standard is 18mm, 60?
The thickness is 20mm, and the insufficient thickness must be supplemented with gaskets.
6. Select the correct intermediate ring. 31? (including) the following concave, 32? Above flat.
7. Select an appropriate stripper plate (based on the principle that it is greater than 3mm of the tool).
After the completion of die combination, check whether the vertical direction of the upper and lower dies and stripper plate is correct, and calibrate the tool on the tool calibrator.
(6) Apply the tool die according to the tool program.
(7) Prepare appropriate materials.
(8) Start running the program sprint.
(9) After the first sample is punched, measure whether the dimensions of each part are the same as the drawing, whether the burr is normal, and whether the process needs to be changed.
If so, the program must be changed first (if there are still materials and products in continuous production later, the qualified parts shall be retained and the material number shall be marked at the appropriate position as a sample for comparison in future production).
(10) Before production, it is necessary to consider how to place the punched materials to ensure quality and facilitate the use of the next process;
Pay attention to the storage condition of the bottom material box at any time during production (not too much, inconvenient for handling);
When the mold is lubricated, remove the debris on the table at any time (to avoid scratching the working object).
(11) Pay attention to whether the cutting tool leaks or breaks during production; Whether the burr meets the requirements; Whether the bed surface is clean; Whether the processed objects are scratched and pay attention to sudden collision, stripper plate falling off, etc.
(12) In case of the above situation, press the emergency stop switch immediately.
If there is a code displayed on the computer screen, it shall be eliminated according to the operation manual of each model.
Otherwise, the maintenance shall be carried out according to the general method, and the production shall be restarted after removing the obstacles.
(14) During production, the molds (knives), materials and other data required for the next work project shall be prepared so that after the work is completed, the production can continue in the shortest time (i.e. shorten the idle time of the machine and improve the grain movement rate).
(15) When the workpiece is delivered to the next workstation after completion, the correct quantity and precautions shall be informed.
(16) After the machine tool stops working, the following items shall be completed:
- Remove the waste bin;
- Retract the tool into the tool magazine;
- Adjust the bed surface to the middle position;
- Air compressor is deflated;
- Perform level I (daily) maintenance;
- Clean the surrounding environment;
- Perform level 1 (daily) maintenance:
1. Check the lubrication point of the machine to see if there is lubricating oil. Whether to add;
2. Wipe and lubricate the x-axis and y-axis.
3. Clean the garbage of the upper and lower molds of the c-axis.
4. Clean the gear and rack residues of the x-axis and y-axis motors.
5. Check whether the electrical control panel is loose and whether the function is normal.
6. Open the electrical panel door to check whether the electrical switch is normal.
Operating skills
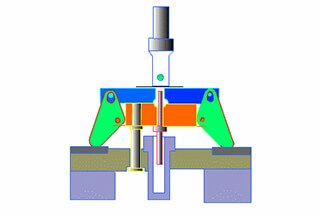
Ensure the best tooling die clearance
Die clearance refers to the sum of the clearance on both sides when the punch enters the lower die. It is related to plate thickness, material and stamping process.
Proper die clearance can ensure good punching quality, reduce burr and collapse, keep the plate flat, effectively prevent material carrying and prolong the service life of the die.
By checking the stamping waste, we can determine whether the die clearance is appropriate.
If the gap is too large, the waste will have rough undulating fracture surfaces and small bright surfaces.
The larger the gap, the greater the angle between the fracture surface and the bright surface.
Crimping and fracture will be formed during punching, and even a thin edge protrusion will appear.
On the contrary, if the gap is too small, there will be small angle fracture surface and large bright surface.
When local stamping such as slotting, step punching and shearing is carried out, the lateral force will deflect the punch and cause too small unilateral clearance.
Sometimes the edge offset is too large, which will scratch the lower die and cause rapid wear of the upper and lower dies.
When the die is stamped with the best clearance, the fracture surface of the waste and the bright surface have the same angle and coincide with each other, which can minimize the blanking force and reduce the burr of the punching.
Timely grinding can effectively prolong the service life of the die
If the workpiece has excessive burrs or abnormal noise during stamping, the die may be passivated.
Check the punch and lower die. When the edge wear produces an arc with a radius of about 0.10mm, it is necessary to grind.
Practice shows that frequent micro grinding rather than grinding when it is necessary will not only maintain good workpiece quality and reduce blanking force, but also prolong the service life of the die by more than twice.
In addition to knowing when to grind the die, it is particularly important to master the correct grinding method.
Die grinding procedures are as follows:
1) Sintered alumina grinding wheel with the hardness of D ~ J and abrasive particle size of 46 ~ 60 is used.
It is best to select the grinding wheel suitable for high-speed steel grinding.
2) During grinding, hold the punch vertically in the V-groove or fixture of the magnetic chuck of the surface grinder.
The grinding amount each time is 0.03 ~ 0.05mm. Repeat grinding until the punch is sharp.
The maximum grinding amount is generally 0.1 ~ 0.3mm.
3) When the grinding force is large or the die is close to the grinding wheel, adding coolant can prevent the die from overheating and cracking or annealing.
High-quality and multi-purpose coolants shall be selected according to the manufacturer’s requirements
4) The downward feed of the grinding wheel is 0.03 ~ 0.08mm, the transverse feed is 0.13 ~ 0.25mm, and the transverse feed rate is 25 ~ 3.8m/min.
5) After grinding, polish the edge with an oilstone to remove burrs, and grind a fillet with a radius of 0.03 ~ 0.05mm to prevent the edge from cracking.
6) Demagnetize the punch and spray lubricating oil to prevent rust.
Methods of eliminating and reducing sticking
Due to the pressure and heat during stamping, the fine particles of sheet metal will be bonded to the punch surface, resulting in poor punching quality.
The adhesive can be removed by grinding with a fine oilstone, and the grinding direction shall be the same as the movement direction of the punch, so as to avoid further adhesive.
Do not polish with coarse gauze, so as to prevent the surface of the punch from becoming rougher and sticking more easily.
Reasonable die clearance, good stamping process and necessary sheet metal lubrication will reduce the generation of sticking materials.
To prevent overheating, lubrication is generally used, which will reduce friction.
If lubrication is not possible or waste rebound occurs, take the following methods:
Alternatively, multiple punches of the same size are used to punch in turn, so that it can have a long cooling time before being reused.
Stop using the overheated die.
Through programming control of die change, interrupt its repeated work for a long time, or reduce its stamping frequency.
Measures to prevent material deformation when punching many holes
If a plate is punched with many holes, the plate cannot be kept flat due to the accumulation of punching shear stress.
During each punching, the material around the hole deforms downward, resulting in tensile stress on the upper surface and compressive stress on the lower surface.
For a small number of punching holes, the effect is not obvious, but when the number of punching holes increases, the tensile and compressive stresses accumulate somewhere until the material deforms.
One way to eliminate the deformation of the ratio class is: first punch every other hole, and then return to punch the remaining holes.
Although this will also produce stress, it will alleviate the stress accumulation during sequential stamping in the same direction, and offset the stresses of the front and rear groups of holes, so as to prevent sheet metal deformation.
Try to avoid punching too narrow strips
When the die is used to cut the plate with a width less than the plate thickness, the punch will be bent and deformed due to the action of lateral force, so that the gap on one side is too small or the wear is intensified.
In serious cases, the lower die will be scratched and the upper and lower dies will be damaged at the same time.
It is recommended not to use narrow strip sheet with a step width less than 2.5 times of sheet thickness.
When cutting too narrow strip, the sheet will tend to bend into the opening of the lower die rather than be completely cut off, or even wedge into the side of the die.
If the above situation cannot be avoided, it is recommended to use a fully guided die with the return plate supporting the punch.
Surface hardening of punch and its application scope
Although heat treatment and surface coating can improve the surface characteristics of punch, it is not a general method to solve stamping problems and prolong die life.
Generally speaking, the coating improves the surface hardness of the punch and improves the lubricity of the side, but in the stamping of large tonnage and hard materials, these advantages disappear after about 1000 times of stamping.
Case hardened punches may be used for the following cases:
- Punching soft or viscous materials (such as aluminum);
- Thinned abrasive materials (such as glass epoxy sheet);
- Thinned hard materials (such as stainless steel);
- Frequent step punch.
Abnormal lubrication:
Surface hardening usually adopts titanium plating, nitriding and other methods, and the thickness of the surface hardening layer is 12 ~ 60μm is a part of the punch matrix, not just the coating.
Case-hardened molds can be sharpened in the usual way.
Surface hardening can reduce the wear of the die when punching stainless steel plate, but it can not prolong its service life.
Proper lubrication, timely grinding and operation according to regulations are effective methods.
Maintenance of punch die position in case of poor neutrality
If the die position of the punch is not neutral, resulting in rapid passivation of the die and poor machining quality of the workpiece, the following points can be overhauled:
- Check the level of the machine tool and readjust it if necessary;
- Check and lubricate the die hole and guide ring key on the rotary table, and repair in time in case of damage;
- Clean the lower die base of the rotary table to facilitate the accurate installation of the lower die, check the wear of its key or keyway, and replace it if necessary;
- Use a special mandrel to calibrate the die station, and adjust it in time in case of deviation.
Conclusion
The use of CNC punch is a knowledge, which needs to be explored and applied flexibly in order to achieve the best use effect.