Lifting and installation
The CNC press brake is composed of a frame, ram, worktable, oil cylinder, die, hydraulic proportional servo system, position detection system, numerical control system, and electrical system.
The frame adopts an assembly structure, which is assembled by left and right columns, oil tank, middle beam, bottom beam, and worktable main body.
Each component is equipped with lifting holes for installation and lifting, and suitable lifting tools and equipment must be used, considering the weight of each component.
The installation accuracy of the CNC press brake directly affects its geometric accuracy and service performance. Therefore, the installation should be carried out by professionals, or the manufacturer should send personnel to the site for guidance.
Before installing the CNC press brake, the foundation must be prepared 15 days in advance. The foundation drawing specifies the minimum dimensions of the shape and depth, and the user can increase them according to local endurance. The user must prepare the crossbar, base plate, and power incoming wire as required and embed them. The company provides the rest.
The surface near the 8 trapezoidal square holes reserved for anchor bolts should be leveled with a level gauge to facilitate preliminary adjustment during the installation and setting of the CNC press brake. After installation, the machine should be leveled with an adjusting wedge to avoid twisting the frame. Anchor bolts should be tightened, followed by the second pouring of cement slurry.
After the secondary poured cement slurry dries, the CNC press brake must be accurately adjusted. The surface of the workbench on which the level gauge is placed should be free of oil, dust, and dirt. After leveling, the longitudinal and transverse levels should be within 0.2/1000m.
Once the CNC press brake is installed and adjusted, the user can prepare the pit cover plate according to the shape of the CNC press brake.
Electrical wiring
The CNC press brake is powered by a three-phase 380V and 50Hz power supply. The control circuit is supplied with AC 220V and 50Hz power by the control transformer, and the solenoid valve is powered by a DC 24V power supply.
To avoid excessive voltage peaks caused by current peaks, the incoming power supply line must be reliably connected to the machine’s power supply line with a conductor with a sufficient cross-sectional area.
To ensure the safety of personnel and equipment, it is necessary to establish a reliable connection between the grounding of the machine tool and the grounding grid of the workshop using a conductor with the same cross-section as the power supply line.
Before turning on the CNC press brake, check whether the power supply voltage and frequency meet the machine’s requirements. The allowable variation range for power supply voltage is ± 5%, and the frequency variation range is ± 1%.
After turning on the power supply, turn on the machine and observe the oil pump motor’s rotation direction. If the rotation direction is opposite to the marked direction, exchange any two phase lines in the three-phase power supply.
General requirements for programmable logic controllers (PLCs)
| Control power supply | AC220V single phase 50Hz |
| Power fluctuation | AC 198∽242V |
| Ambient temperature | 0℃∽55℃ |
| Ambient humidity | 10% ∽ 90% no condensation |
| Vibration | 10 ∽ 55Hz 0.7mm (maximum 2G) |
| To attack | 10g XYZ triad |
| Anti-interference | 1000vp-p 1YS30 ∽ 100Hz (analog interference) |
| Withstand voltage | AC1500v for 1 minute (between the grounding terminal and any other terminal) |
| Insulation resistance | 5MΩ 500V DC (ditto) |
| Installation environment | No harmful gas, no metal fragments |
The backup battery in the PLC is a lithium battery, which can last for about 5 years.
Note: For the Delem DA-60 series CNC system, the programmable controller (PLC) is integrated into the CNC system.
Inspection before use
Before using the machine, first fill the oil tank with hydraulic oil and observe the oil level. The hydraulic oil should occupy more than 4/5 of the space of the oil mark.
Fill all lubrication points with corresponding grease and lubricating oil.
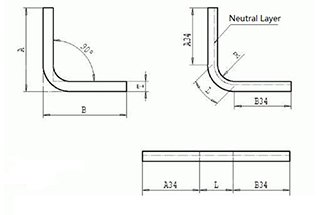
Determine the thickness of the bending plate and the opening of the lower die (generally, the opening of the die is 8 to 10 times the thickness of the bent plate).