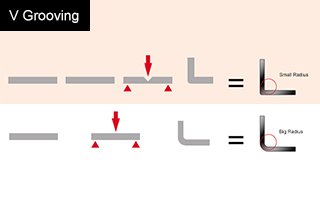
V-Grooving Machine: Essential Steps and Precautions | MachineMFG

V-Grooving Machine: Essential Steps and Precautions

0
(0)

Preparation:

  • Before starting the machine for each shift, perform daily maintenance and lubrication on the V-grooving machine according to the machine’s inspection and maintenance items. Check the oil content of the oil-water separator, which should not exceed 2/3 of the container. Check the remaining amount of coolant, which should not be lower than the minimum oil level marked on the container.
  • After starting the machine each time, check the air pressure. Proceed to the next V-grooving operation only when the pressure is confirmed to be normal.

Equipment / Tools:

V-grooving machine, turnover cart, tape measure, caliper, oil-based pen

Operating Instructions:

Fig.A
Fig.B
Fig.C
  1. Place a turnover cart loaded with materials to be V-grooved and an empty turnover cart in appropriate positions in front of the V-grooving machine, with the cart carrying materials to be V-grooved placed right next to the machine.
  2. After starting the machine, press the F3 key for manual operation, then press the Z, X, and Y keys to move the tool holder back to the origin on the Z, Y, and X axes, respectively. Press the ︾ key to move the Y-axis parameter on the main interface to between 40mm and 50mm.
  3. The operator places the material from the turnover cart onto the V-grooving machine’s worktable, steps on the foot switch, and secures the material with the clamping angle. Measure the material’s length, width, and thickness. The length is the distance from the left end of the material to the last blade of the tool holder, and the width is the smaller value of the two ends’ lengths.
  4. Press F1 to return to the home page, then press F6 to set parameters (Figure A). Use the arrow keys to move the cursor, and input the total material length, width, and thickness. Input the groove distance, groove depth, and cycle count according to the processing requirements. Press the enter key to confirm each input.
  5. The cycle count refers to the number of passes for each groove (Figure B). For example, with a groove depth of 1.0 and a cycle count of 3, press F5 to set the tool parameters, and set the total progress to 1.0, with the first pass at 0.5, the second pass at 0.3, and the third pass at 0.2.
  6. Press F7 to save, F1 to return to the home page, then press F1 for automatic operation and return to the interface (Figure C). Press the start button to begin the automatic V-grooving operation, watching the moving tool holder while keeping the right hand on the pause button, ready to stop the machine immediately if an error occurs.
  7. After the V-grooving is complete, the operator writes the groove distance between the corresponding grooves with an oil-based pen. Step on the foot switch to release the clamping foot (Figure E) and remove the panel. For panels with the same size and processing requirements, simply re-input the total length and width, then save, return to the home page, and start the automatic operation. If not, repeat steps 3, 4, 5, and 6.
Fig.D
Fig.E

Precautions:

  • Operators must wear work clothes and gloves, and avoid wearing tank tops, shorts, or slippers. Inform the shift leader immediately if there’s any discomfort or accident.
  • Before starting the machine and beginning the V-grooving process, return the X, Y, and Z axes to their original positions.
  • If the operating interface screen goes black, press any numeric key to return to the operating interface.

How useful was this post?

Click on a star to rate it!

Average rating 0 / 5. Vote count: 0

No votes so far! Be the first to rate this post.

As you found this post useful...

Follow us on social media!

We are sorry that this post was not useful for you!

Let us improve this post!

Tell us how we can improve this post?

Leave a Comment

Your email address will not be published. Required fields are marked *

Scroll to Top