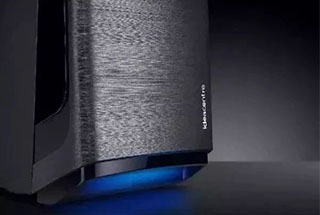
Achieving Smooth Elevator Parts: Sharp Edge & Burr Control
Ever wondered why tiny metal burrs can cause big problems? This article explores the causes and dangers of sharp edges and burrs on sheet metal parts, especially in elevators. From…
How can a mold achieve a mirror-like finish? Polishing is not just about aesthetics; it’s essential for durability and efficient production. This article explores six key methods of mold polishing, from mechanical and chemical to ultrasonic and magnetic techniques. Readers will discover how each method enhances surface quality and learn the basic procedures for achieving flawless finishes. Dive in to find out how to elevate your mold polishing game and ensure superior results in your manufacturing processes.
Polishing enhances not only the appearance of the workpiece, but also its resistance to corrosion and abrasion on the material surface.
Additionally, it can provide additional benefits to plastic molds, such as making it easier to remove the finished product and reducing the production cycle time. As a result, polishing is a crucial step in the production of plastic molds.
At present, the following 6 polishing methods are commonly used:
Mechanical polishing is a technique that involves removing protruding material from the surface of a workpiece by cutting to achieve a smooth finish. This is typically achieved through manual means using tools such as whetstones, wool wheels, and sandpaper.
For special parts such as rotating surfaces, auxiliary tools like turntables can be used. When a high surface quality is required, ultra-precise grinding polishing can be utilized. This method employs a special grinding tool and involves pressing it against the workpiece in a grinding polishing liquid that contains abrasives, and subjecting it to high-speed rotation.
This process can result in a surface roughness of Ra0.008μm, the highest among various polishing methods, and is commonly used for optical lens molds.
Chemical polishing is a process in which the surface of the material is smoothened by dissolving the microscopically raised parts in a chemical medium, dissolving them preferentially compared to the concave parts.
The main advantage of this method is that it does not require complex equipment and can polish workpieces with intricate shapes, and it has a high level of efficiency by being able to polish multiple workpieces at once.
The main challenge of chemical polishing is the preparation of the polishing solution.
Typically, chemical polishing results in a surface roughness of several 10μm.
The basic principle of electrolytic polishing is similar to chemical polishing in that the surface is smoothed by the selective dissolution of the material with the tiny protruding parts on the surface. Compared to chemical polishing, electrolytic polishing provides a superior result by eliminating the effect of cathode reactions.
The electrochemical polishing process is divided into two steps:
(1) Macro polishing.
The dissolved product diffuses into the electrolyte, and the surface roughness of the material decreases, Ra> 1 μm.
(2) Micro polishing.
Anodic polarized, surface brightness improved, Ra <1μm.

The workpiece is placed in an abrasive suspension and positioned in an ultrasonic field, where the abrasive is ground and polished on the surface of the workpiece through ultrasonic vibration.
Ultrasonic machining has a minimal macro force and does not cause deformation to the workpiece, but it can be challenging to produce and install the tooling.
Ultrasonic processing can be combined with chemical or electrochemical methods. By combining with solution corrosion and electrolysis, ultrasonic vibration is used to stir the solution and dissolve dissolved products on the surface of the workpiece, ensuring a uniform corrosion or electrolyte near the surface.
The cavitation of ultrasonic waves in the liquid can also suppress the corrosion process, making it beneficial for surface brightening.
Fluid polishing is a process where the surface of a workpiece is polished by using a high-speed flowing liquid that carries abrasive particles. The abrasive particles in the liquid wash the surface of the workpiece to achieve a polished finish.
The common methods include:
Hydrodynamic grinding uses hydraulic pressure to drive the liquid medium, which contains abrasive particles, to rapidly flow back and forth over the surface of the workpiece.
The medium is primarily composed of specialized compounds with good fluidity under low pressure, along with abrasives. For example, silicon carbide powder can be used as the abrasive material.
Magnetic grinding and polishing utilizes magnetic abrasives to form abrasive brushes under the influence of a magnetic field to polish workpieces. This method boasts high processing efficiency, superior quality, easy control of processing conditions, and good working conditions. With a suitable abrasive, a surface roughness of Ra0.1μm can be achieved.
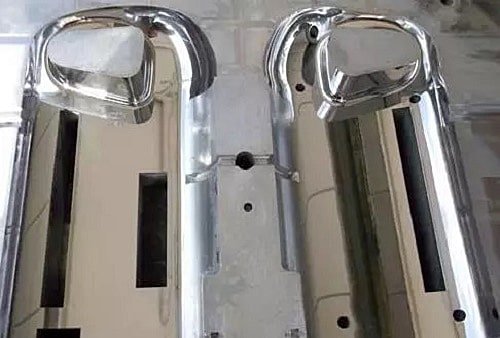
In plastic mold processing, the polishing required is distinct from surface polishing in other industries. In fact, mold polishing should be referred to as mirror processing. This process demands not only high standards of polishing but also stringent requirements for surface flatness, smoothness, and geometric accuracy. In contrast, surface polishing generally requires only a shiny surface.
The standard of mirror processing is divided into four levels:
Due to the difficulty in precisely controlling the geometric accuracy of parts with methods such as electrolytic polishing and fluid polishing, the surface quality produced by methods such as chemical polishing, ultrasonic polishing, and magnetic polishing may not meet the requirements. Hence, mechanical polishing is primarily relied upon for mirror polishing of precision molds.
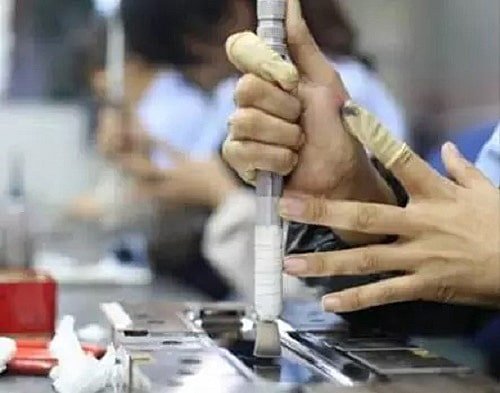
To achieve high-quality polishing results, it is essential to have high-quality polishing tools and accessories such as whetstones, sandpaper, and diamond abrasive paste. The choice of polishing method depends on the condition of the surface after previous processing steps, such as machining, EDM, grinding, and others.
The general process of mechanical polishing is as follows:
After milling, EDM, grinding, and other processing, the surface can be polished by using a rotating surface polishing machine or ultrasonic grinding machine with a rotation speed of 35,000-40,000 RPM. The commonly used method is to remove the white electric spark layer by using a 3mm diameter wheel and WA #400.
This is followed by manual whetstone grinding, using strips of whetstone with kerosene as a lubricant or coolant. The general order is #180 to #240, #320, #400, #600, #800, and #1000. However, many mold makers choose to start with #400 to save time.
Semi-precision polishing mainly uses sandpaper and kerosene. The sandpapers used have numbers: #400, #600, #800, #1000, and #1200, and #1500. However, it’s important to note that #1500 sandpaper is only suitable for hardened mold steel (above 52HRC) and not for pre-hardened steel, as it may cause burns on the surface of pre-hardened steel.
Diamond polishing paste is predominantly used for fine polishing. When a polishing cloth wheel is used in conjunction with diamond abrasive powder or paste for grinding, the typical grinding sequence is 9μm (#1800) to 6μm (#3000) to 3μm (#8000). The 9μm diamond abrasive paste and polishing cloth wheel can remove the hairline scars left by #1200 and #1500 sandpaper.
The subsequent polishing is done with a sticky felt and diamond abrasive paste, starting with 1μm (#14000), followed by 1/2μm (#60000), and finally 1/4μm (#100000). Polishing with an accuracy of 1μm or greater should be performed in a clean room within the mold processing workshop to avoid any contaminants that may damage the high-precision polished surface after hours of work.
To achieve even more precise polishing, a completely clean environment is necessary as even small amounts of dust, smoke, dandruff, and drool can negatively impact the final result.
Pay attention to the following points when polishing with sandpaper:
1) Polishing with sandpaper requires the use of cork rods or bamboo sticks. When polishing round or spherical surfaces, the use of cork rods is better suited to match the surface’s arc. Harder bars, such as cherry wood, are more appropriate for polishing flat surfaces. The ends of the wooden strip should be trimmed to align with the shape of the steel surface to prevent the sharp edge of the wooden strip from making deep scratches on the surface of the steel.
2) When switching between different types of sandpaper, the polishing direction should change from 45° to 90° to distinguish between the stripes and shadows left by the previous sandpaper. Before switching, the polishing surface must be thoroughly wiped with a cleaning solution, such as 100% cotton moistened with alcohol, as any small grit left on the surface can ruin the entire polishing process. This cleaning step is also important when transitioning from sandpaper polishing to diamond polishing. All particles and kerosene must be completely removed.
3) To avoid scratching and burning the surface of the workpiece, extra caution must be taken when polishing with #1200 and #1500 sandpaper. A light load should be used, and the surface should be polished using a two-step method. When polishing with each type of sandpaper, two rotations in two different directions between 45° and 90° should be performed.
Pay attention to the following points when diamond grinding and polishing:
This polishing should be done with as light pressure as possible, especially when polishing pre-hardened steel parts and using fine grinding paste. The recommended load for polishing with #8000 abrasive paste is between 100 to 200g/cm², but it can be difficult to maintain this level of pressure consistently. To make it easier, you can add a narrow handle to the wooden bar, such as by attaching a copper piece or cutting part of the bamboo bar to make it softer. This will help control the polishing pressure and prevent the mold surface pressure from being too high.
When using diamond grinding and polishing, not only should the working surface be clean, but the worker’s hands should also be cleaned thoroughly. Each polishing session should not last too long, as the shorter the time, the better the result. If the polishing process takes too long, it can cause “orange peel” and “pitting.” To obtain high-quality polishing results, avoid methods and tools that generate heat during the polishing process, such as a polishing wheel. The heat generated by a polishing wheel can easily cause “orange peel.”
It is important to clean the surface of the workpiece and remove all abrasives and lubricants when the polishing process is completed. Then, a layer of anti-rust coating should be applied to the surface. The quality of the polishing is mainly dependent on the polishing technique, which is largely performed manually. Other factors that can affect the quality of the polishing include the mold material, the condition of the surface before polishing, and the heat treatment process.
High-quality steel is a necessary condition for good polishing quality. If the surface hardness of the steel is uneven or has different characteristics, polishing can often be difficult. The presence of various inclusions and pores in steel also makes polishing challenging.
Increasing hardness makes grinding more difficult, but results in a smoother surface after polishing.
As the hardness increases, so does the time required to achieve a lower roughness during polishing.
At the same time, the higher the hardness, the lower the risk of over-polishing the surface.
During the machining of steel, the surface can become damaged due to heat, internal stress, or other factors during the crushing process. Incorrect cutting parameters can also negatively impact the polishing outcome.
The surface after electrical discharge machining (EDM) is more challenging to grind than a surface that has undergone ordinary machining or heat treatment. To avoid forming a hardened layer on the surface, precision EDM trimming should be used at the end of the EDM process.
Improper EDM finishing can result in a heat-affected layer with a depth of up to 0.4mm, which has a higher hardness than the matrix and must be removed. To achieve the best polishing results, it is recommended to add a rough grinding process to completely remove the damaged surface layer and create a smooth metal surface as a foundation for polishing.

As the founder of MachineMFG, I have dedicated over a decade of my career to the metalworking industry. My extensive experience has allowed me to become an expert in the fields of sheet metal fabrication, machining, mechanical engineering, and machine tools for metals. I am constantly thinking, reading, and writing about these subjects, constantly striving to stay at the forefront of my field. Let my knowledge and expertise be an asset to your business.