Top 15 Best Stamping Press Manufacturers & Brands in World
Have you ever wondered how the machines that shape our world are made? This blog takes you on a journey through the top punch press machine manufacturers. You'll learn about…
Have you ever wondered how the tiniest details can make or break a product’s quality? In mold manufacturing, the polishing process is crucial. This article explores various polishing methods, highlighting how each technique enhances mold quality and extends its service life. Get ready to uncover the secrets behind flawless molds!
In the process of diversifying and upgrading industrial products, improving the quality of molds, which directly impact product quality, is a crucial task. During the mold manufacturing process, surface grinding and polishing of parts, which involves smooth processing and mirror processing after shape processing, is an important step in enhancing mold quality.
Adopting an appropriate polishing method can enhance mold quality and extend its service life, thus improving the quality of the final product.
Mechanical polishing is a method of smoothing the surface of a workpiece by removing the raised portion through cutting or plastic deformation of the material. This method typically involves using oil stone strips, wool wheels, sandpaper, and manual operation.
For higher surface quality requirements, a superfine polishing method can be applied.
Ultra-fine grinding and polishing, a specialized grinding tool, uses high-speed rotary motion in a polishing liquid containing abrasives to achieve a surface roughness of Ra0.008 μm, the best in various polishing methods. This method is commonly used in optical lens molds. Mechanical polishing is the primary method for mold polishing.
Chemical polishing is a technique in which a material is dissolved in a chemical medium, resulting in a smoothing of the slightly raised portion of the surface. This method can polish workpieces with complex shapes and has the advantage of being able to polish multiple workpieces simultaneously, making it highly efficient. The surface roughness obtained through chemical polishing is typically Ra10 μm.
The basic principle of electropolishing is similar to that of chemical polishing, as it involves selectively dissolving the surface of the material to achieve a smooth surface.
Compared to chemical polishing, electropolishing eliminates the impact of cathode reactions and provides a better outcome.
Ultrasonic polishing is a technique that utilizes ultrasonic vibrations from a tool section to polish brittle and hard materials with an abrasive suspension. The workpiece is immersed in an abrasive suspension and subjected to an ultrasonic field, causing the abrasive to grind and polish the surface of the workpiece through the action of ultrasonic waves.
Ultrasonic machining has a minimal macroscopic force and does not result in workpiece deformation, but the tooling can be challenging to manufacture and install.
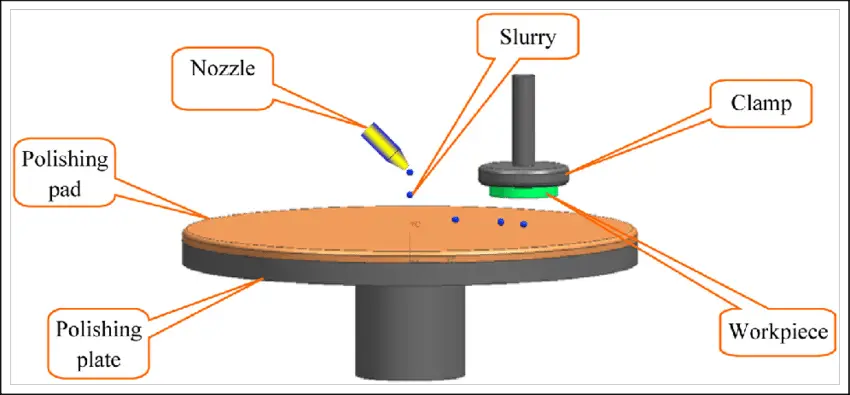
Fluid polishing utilizes a flowing liquid and the abrasive particles it contains to polish the surface of a workpiece. Hydrodynamic grinding is powered by hydraulic forces.
The medium is primarily composed of a specialized compound (polymeric substance) that flows at a low pressure and is combined with an abrasive. The abrasive can be made of silicon carbide powder.
Magnetic grinding and polishing involves using a magnetic abrasive to create an abrasive brush under the influence of a magnetic field, allowing for grinding of the workpiece.
This method has a high processing efficiency, provides good quality results, and allows for easy control of processing conditions. With an appropriate abrasive, the surface roughness can be achieved at Ra 0.1 μm.
To enhance the polishing speed of workpieces with a surface roughness of Ra 1.6 μm or higher, composite polishing can be achieved by combining ultrasonic waves with a dedicated high-frequency narrow pulse high peak current power source.
The simultaneous action of ultrasonic vibration and electric pulses on the surface of the workpiece rapidly reduces its surface roughness. This method is highly effective in polishing rough surfaces of molds after machining using lathe, milling, electrical spark, and wire cutting.
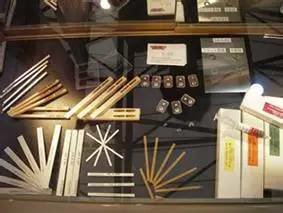
Common tools for mold polishing include: sandpaper, oilstone, felt wheel, abrasive paste, alloy trowel, diamond grinding needle, bamboo, fiber whetstone, round rotary grinding machine.
3.1 Rough polishing
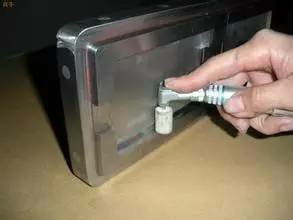
Surfaces after finishing, EDM, grinding, etc. can be polished with a rotating surface polisher with a rotational speed of 35 000 to 40 000 r/min.
Then there is a manual oil stone grinding, strip of oil stone plus kerosene as a lubricant or coolant.
The order of use is 180#→240#→320#→400#→600#→800#→1 000#.
3.2 Semi-fine polishing
Semi-finishing mainly uses sandpaper and kerosene. The number of sandpaper is: 400#→600#→800#→1 000#→1 200#→1 500#.
In fact, #1 500 sandpaper is only used for hardened die steel (above 52 HRC), not for pre-hardened steel, as this may cause damage to the surface of the pre-hardened steel and will not achieve the desired polishing effect.
3.3 Fine polishing
Fine polishing mainly uses diamond abrasive paste.
If grinding with a polishing cloth wheel to mix diamond abrasive powder or abrasive paste, the usual grinding order is 9 μm (1 800 #) → 6 μm (3 000 #) → 3 μm (8 000 #).
The 9 μm diamond paste and polishing cloth wheel can be used to remove the hair marks from the 1 200# and 1 50 0# sandpaper.
The polishing is then carried out with a felt and a diamond paste in the order of 1 μm (14 000 #) → 1/2 μm (60 000 #) → 1/4 μm (100 000 #).
The polishing process should be conducted in two separate working locations, with rough grinding processing carried out at one location and fine polishing processing carried out at another. Care should be taken to remove any sand particles left on the surface of the workpiece from the previous process.
Typically, after rough polishing using oil stone and 1 200# sandpaper, the workpiece should be cleaned of any dust to ensure that no dust particles adhere to the mold surface. For accuracy requirements above 1 μm, including 1 μm, polishing can be performed in a clean polishing chamber.
For more precise polishing, it must be done in an absolutely clean environment, as dust, smoke, dandruff, and water droplets can ruin high-precision polished surfaces. After the polishing process is complete, the surface of the workpiece should be protected from dust.
When the polishing process is finished, all abrasives and lubricants must be thoroughly removed to ensure that the surface of the workpiece is clean, and then a layer of mold anti-rust coating should be applied to the surface of the workpiece.
5.1 Workpiece surface condition
During the machining process, the surface layer may be damaged by heat, internal stress, or other factors, and incorrect cutting parameters can impact the polishing result. The surface after EDM is harder to grind than surfaces after machining or heat treatment.
Therefore, EDM should be completed before the end of the EDM process, otherwise a hardened thin layer will form on the surface. If EDM is not properly performed, the depth of the heat-affected layer can reach up to 0.4 mm, and its hardness is higher than the substrate. This hardened layer must be removed.
For best results, it’s recommended to include a rough grinding process to provide a solid foundation for polishing.
5.2 Steel quality
High-quality steel is essential for achieving good polishing results, as various inclusions and pores in the steel will impact the polishing quality. To obtain a satisfactory polishing effect, the surface roughness of the workpiece must be noted at the start of machining.
If a workpiece requires mirror polishing, it is crucial to select steel with good polishing performance and to undergo heat treatment, otherwise, the desired effect may not be achieved.
Improper heat treatment can result in uneven surface hardness of the steel or differences in its characteristics, making the polishing process more challenging.
5.4 Polishing technology
Polishing is primarily performed manually, making human skills the primary factor affecting the quality of polishing. It is commonly believed that polishing technique affects surface roughness.
In reality, a good polishing effect can only be achieved by combining good polishing techniques with high-quality steel and proper heat treatment. Conversely, if the polishing technique is poor, even high-quality steel may not produce a mirror-like finish.
6.1 Mold sandpaper grinding and oil stone grinding should pay attention to the following matters
(1) For harder mold surfaces, only clean and soft oilstone sanding tools should be used.
(2) When switching to a finer sandpaper, the workpiece and the operator’s hands must be cleaned to prevent carrying over coarse sand to the next fine-grinding operation.
(3) During each grinding process, the sandpaper should be sanded from a different 45° direction until the upper layer of sand is removed. Once the upper layer of sand has been removed, the sanding time should be increased by 25%, before switching to a finer sandpaper.
(4) Sanding in different directions helps to prevent the formation of uneven waves on the workpiece.
6.2 Matters needing attention in diamond grinding and polishing
Diamond grinding and polishing should be performed with light pressure, particularly when polishing pre-hardened steel parts and using fine abrasive pastes.
The typical pressure when using an 8000# abrasive paste is 100-200 g/cm2, but maintaining this level of accuracy can be challenging.
To address this issue, you can create a thin, narrow handle on the strip or cut a portion of the strip to make it more flexible. This helps regulate the polishing pressure and prevents the mold surface from being subjected to excessive pressure.
When utilizing diamond grinding and polishing techniques, not only must the working surface be clean, but the hands of the workers must also be kept clean.
6.3 Plastic mold polishing should pay attention to the following matters
Polishing plastic molds is vastly different from surface finishing in other industries.
Technically, the process should be referred to as mirror processing. This method requires high standards not only for the polishing itself, but also for the surface’s flatness, smoothness, and geometric accuracy.
The mirror polishing standard is divided into four levels: A0=Ra0.008μm, A1=Ra0.016 μm, A3=Ra0.032 μm, and A4=Ra0.063 μm.
Electropolishing, fluid polishing, and other methods are often unable to control geometric accuracy precisely, and the surface quality produced by chemical polishing, ultrasonic polishing, magnetic polishing, and other methods do not meet the necessary requirements.
As a result, precision mold mirror processing is primarily achieved through mechanical polishing.
7.1 Over-polishing
The most significant challenge faced during daily polishing is “over-polishing.” This occurs when the polishing time is extended, leading to a decrease in the quality of the mold surface.
Two symptoms of over-polishing are “orange peel” and “pitting.” Over-polishing is most commonly seen in mechanical polishing.
7.2 The reason why the workpiece has “orange peel”
Uneven, rough surfaces are referred to as “orange peels” and there are various reasons why they occur.
The most frequent cause is overheating of the mold surface or excessive carburization.
High polishing pressure and extended polishing time are the primary causes of “orange peel” formation.
For instance, when using a polishing wheel, the heat generated from the wheel can easily result in “orange peel.”
Harder steels are able to withstand higher polishing pressures, whereas softer steels are more susceptible to over-polishing.
Research has shown that the extent of over-polishing varies depending on the hardness of the steel.
7.3 Measures to eliminate the “orange peel” of the workpiece
When a poor surface quality is detected, many individuals tend to increase the polishing pressure and prolong the polishing time.
However, this approach often leads to a further deterioration of surface quality.
The following methods can be used to remedy:
(1) Remove the flawed surface and use a slightly coarser grit size than before for grinding. Then, perform the grinding with a lower polishing force.
(2) Perform stress relief at a temperature below the tempering temperature of 25°C. Grind with the finest grit size before polishing until the desired outcome is achieved. Finally, polish with a lighter force.
7.4 Reasons for the formation of “pitting” on the surface of the workpiece
The formation of micro-pits or pitting during the polishing process is typically caused by non-metallic impurities in the steel, usually hard and brittle oxides that are removed from the surface of the steel. The main factors contributing to “pitting” are:
(1) Excessive polishing pressure and prolonged polishing time.
(2) Insufficient purity of the steel and a high content of hard impurities.
(3) Surface rust on the mold.
(4) Failure to remove black scale.
7.5 Measures to eliminate pitting corrosion of workpieces
(1) Thoroughly re-grind the surface using a grit size that is slightly coarser than before. The final step of grinding should be performed with a soft and sharp oil stone prior to polishing.
(2) When using a grit size smaller than 1 mm, it is best to avoid using the softest polishing tool.
(3) Minimize the polishing time and force to the extent possible.
Polishing the cavity during the mold production process is a crucial step that affects the quality and lifespan of the mold and, in turn, the quality of the final product.
By understanding the principles and procedures of polishing and selecting an appropriate polishing method, the quality and lifespan of the mold can be improved, resulting in an improvement in product quality.

As the founder of MachineMFG, I have dedicated over a decade of my career to the metalworking industry. My extensive experience has allowed me to become an expert in the fields of sheet metal fabrication, machining, mechanical engineering, and machine tools for metals. I am constantly thinking, reading, and writing about these subjects, constantly striving to stay at the forefront of my field. Let my knowledge and expertise be an asset to your business.