Stainless Steel Mirror Polishing: Process, Method and Requirements
1. Grinding The primary goal of grinding stainless steel weldments is to eliminate welding marks and achieve a surface roughness of R10um on the workpiece, in preparation for bright dipping. Related reading: Surface Roughness: The Comprehensive Guide The grinding stage typically encompasses: The details are as follows: 1. Visual inspection A visual inspection shall be […]
The primary goal of grinding stainless steel weldments is to eliminate welding marks and achieve a surface roughness of R10um on the workpiece, in preparation for bright dipping.
Three steps: coarse grinding, intermediate grinding, and fine grinding;
Grinding of three surfaces: two sides and one edge;
The use of nine polishing machines;
The involvement of 27 control agencies.
The details are as follows:
1. Visual inspection
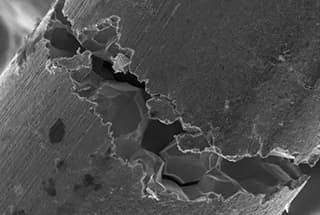
A visual inspection shall be conducted on the workpieces prior to their transfer to the final step of the polishing process. This inspection will assess for any defects that cannot be rectified in this process, such as a missing weld, welding penetration, inconsistent depth of welding points, welding that is too far from the joint, local depression, uneven butt joint, deep scratches, bruises, severe deformation, etc.
If any of these defects are present, the workpieces must be returned to the previous process for repair.
If there are no such defects, the workpieces can then proceed to the polishing process.
2. Rough grinding,
Use a #600 abrasive belt to grind the workpiece by moving it back and forth on three sides.
The objective of this process is to remove the welding marks left on the workpiece from the welding process and to eliminate any bruises that may have occurred in previous processes, in order to achieve the initial formation of the fillet at the weld junction.
The horizontal and vertical surfaces should be largely free of major scratches and bruises.
After this process, the roughness of the workpiece surface should be R0.8mm.
Take care to maintain the correct tilt angle of the abrasive belt machine and control the pressure applied by the machine onto the workpiece during the polishing process.
As a general rule, it is appropriate to form a straight line with the surface being worked on.
3. Semi fine grinding
Use a #800 abrasive belt to grind the three sides of the workpiece by moving it back and forth. This process is mainly used to correct the joints from previous processes and further refine the marks produced during rough grinding.
Grind the marks left from previous processes repeatedly until the surface of the workpiece is free of scratches and appears bright.
The surface roughness of the workpiece after this process should reach R0.4mm.
It is important to note that new scratches and bruises are not allowed during this process, as they cannot be fixed in subsequent processes.
4. Fine grinding
The #1000 abrasive belt is primarily used to correct any fine lines from previous processes. The grinding method is the same as previously described.
The objective of this process is to eliminate any seams between the ground part of the workpiece and the unground part, to further enhance the brightness of the workpiece surface, and to achieve a near mirror-like effect. The surface roughness of the workpiece after this process should reach R0.1mm.
5. Instructions for replacing the abrasive belt:
As a general guideline, a #600 abrasive belt can grind 6-8 pieces of workpieces that are 1500mm in length, a #800 abrasive belt can grind 4-6 pieces, and a #1000 abrasive belt can grind 1-2 pieces.
The exact number of pieces that can be ground may vary depending on factors such as the welding points of the workpieces, the pressure used for polishing, and the method of polishing.
It is important to note that when replacing the abrasive belt, it must be ensured that the belt rotates smoothly on the sponge wheel in order to achieve uniform grinding of the workpiece.
Description of grinding three sides:
The two sides of the weldment that are separated by the welding edge, both horizontal and vertical, need to be polished.
In total, three sides of the weldment require polishing.
A diagram of the polishing process is shown in the accompanying figure.
Schematic Diagram of Welds of Welding Workpieces
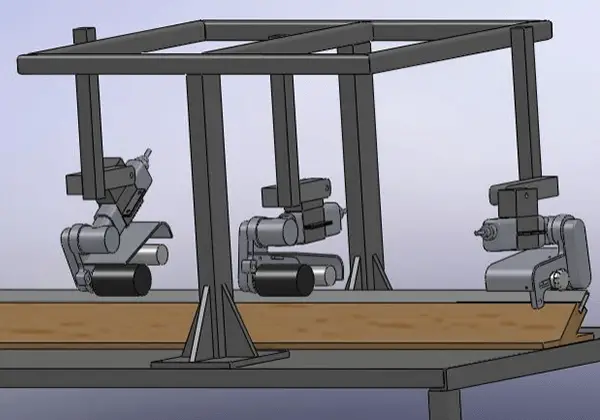
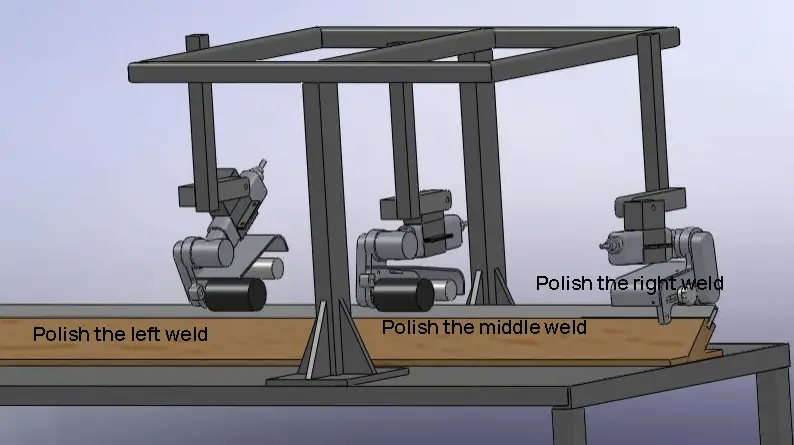
Schematic diagram of nine polishing machines:
Three belt sanders are used as a single process (group) to grind three surfaces.
In actual operation, the grinding position of the subsequent group of belt sanders should be positioned 1-1.5mm ahead of the previous group’s grinding position.
This arrangement allows the subsequent group of belt sanders to more effectively grind and remove any polishing marks left by the previous group.
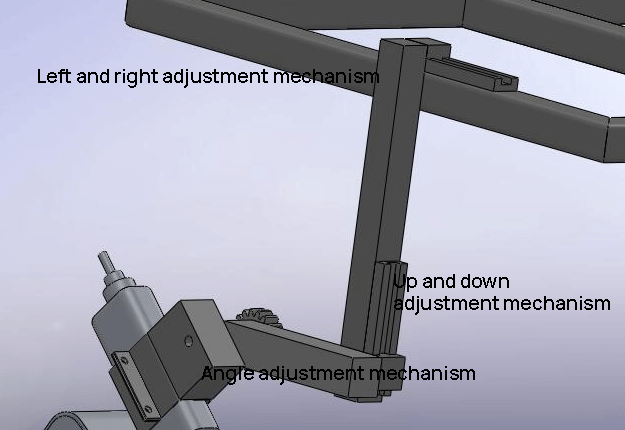
Each belt sander is equipped with 27 adjustment mechanisms, including front and rear adjustment mechanisms, an up and down adjustment mechanism, and an angle adjustment mechanism for the belt sander.
The final equipment for workpiece welding consists of three to four mechanisms, each of which is polished using different abrasive belts. The polishing position, angle, and pressure of each belt sander are controlled by the adjusting mechanism of the polishing machine, which is set before the equipment starts operation to ensure proper positioning, angle, and working pressure.
One of the adjustment mechanisms is equipped with a photoelectric switch that detects signals to prevent over-grinding at both ends of the workpiece. For instance, the angle adjustment mechanism of the abrasive belt machine is set to detect the workpiece entering the lower part of the machine via the photoelectric switch.
At this point, the adjustment mechanism activates and lifts the abrasive belt machine. Once the workpiece reaches a specific position, the mechanism drops the abrasive belt machine, and the polishing begins.
When the polishing is nearly complete, the detection mechanism detects the workpiece and the adjustment mechanism pneumatically lifts the abrasive belt machine. This prevents excessive polishing at both ends of the stainless steel square tube.
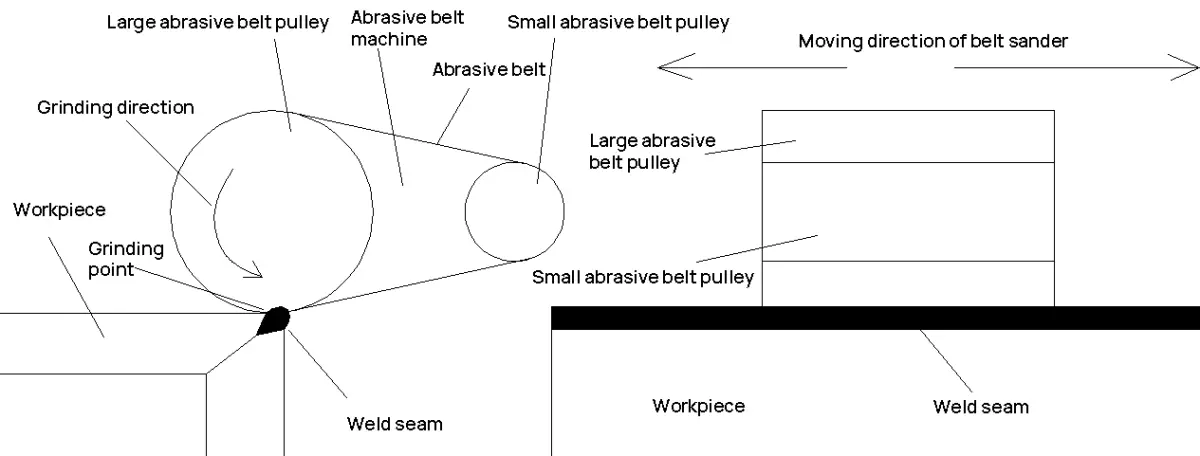
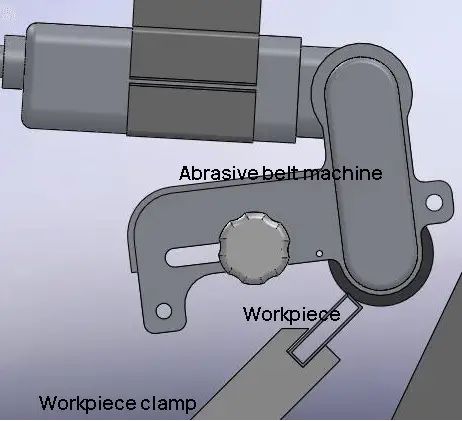
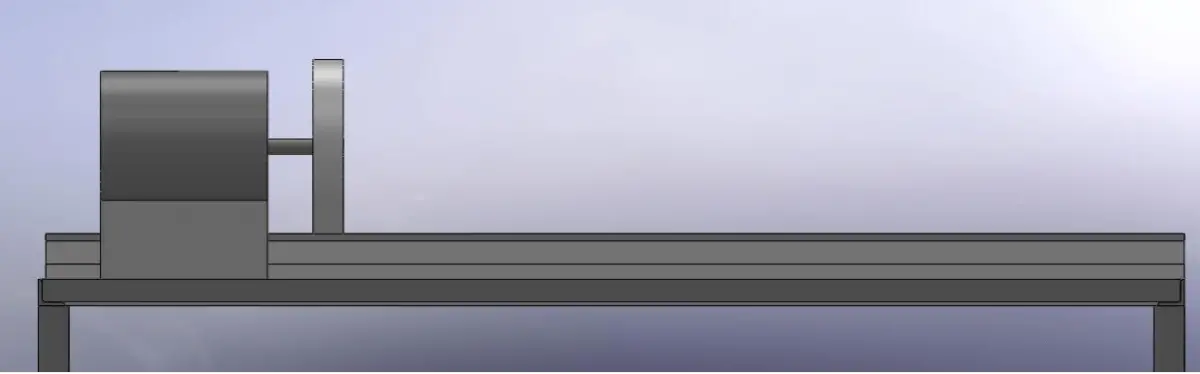
Grinding methods:
The workpiece is ground by pressing the abrasive belt machine’s sea rubber wheel. During grinding, the abrasive belt machine or workpiece can be moved horizontally to remove the welding spots one by one. The image on the right shows the actual polishing method of the polishing machine.
The workpiece is clamped at a 45-degree angle and polished using the large abrasive belt wheel of the abrasive belt machine.
2. Bright dipping
The primary goal of the bright dipping process is to produce a mirror finish on the ground stainless steel. This process typically involves two steps: waxing and polishing. It requires two motors, two wool wheels, a large green wax, and a cloth.
The details are as follows:
1. Visual inspection
Inspect the weldments that were processed in the previous stage visually. Confirm the absence of any issues that cannot be fixed during the polishing stage. These include:
Insufficient polishing to reach 1000 #
Incomplete polishing of all welding points
Rough grinding marks
Severe damage to the protective film
Excessive grinding
Large rounded corners
Significant grinding at both ends
Uneven grinding
Inconsistent grinding
If such problems are found, the weldments must be returned for re-grinding or repair.
Note: This process cannot repair bumps, gouges, or large scratches that occur during the grinding process. However, it can fix very fine lines, such as those from 1000 # grinding, though the process is labor-intensive.
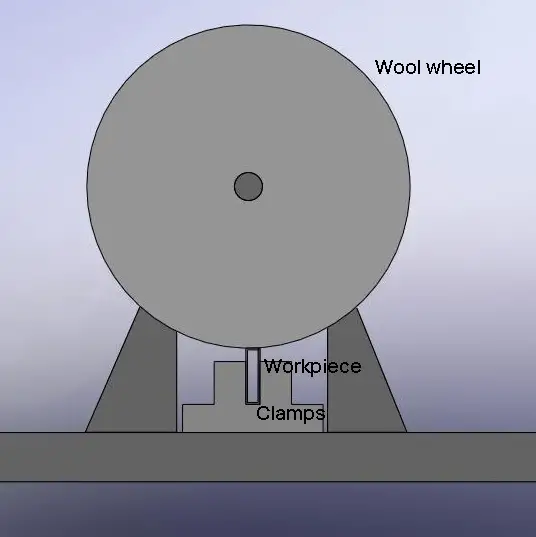
2. Specular surface
A high-speed motor-driven wool wheel is utilized to polish the mirror surface with the help of wax, mimicking the previous polishing method.
The objective of this process is to refine the workpieces after they have undergone previous polishing steps, not to perform additional grinding.
Take care not to apply the polishing wax onto the protective film on the surface of the workpiece during the operation. Ensure that the protective film is not damaged.
3. Burnish
This process is the final step in the mirror surface polishing process.
After completing all previous processes, use a clean cotton cloth wheel to wipe down the surface of the workpiece. This step serves to clean and polish the workpiece.
The aim of this process is to achieve a surface without any welding marks and to enhance the brightness of the workpiece to 8k above mirror reflection. The result should be a uniform mirror-like appearance with minimal differences between the parts that have been polished and those that have not.
4. Notes on waxing:
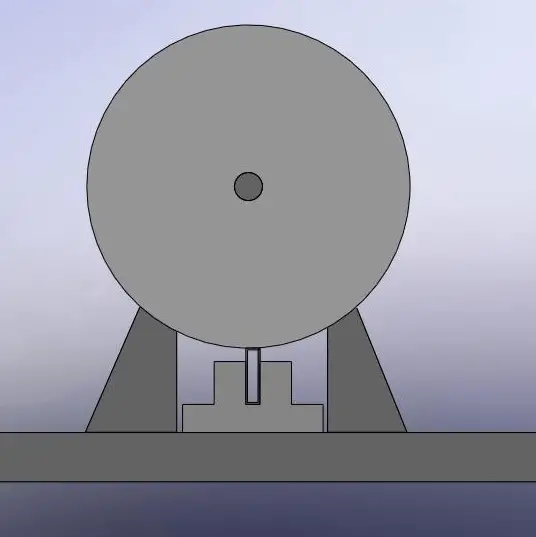
a. Waxing method:
As a general rule, the wool wheel must be coated with wax before grinding the workpiece. The grinding process should not commence until the wool wheel is covered with green wax.
The process for applying the wax is illustrated in the following figure.
b. Why does the high-speed motor directly drive the wool wheel to wax and grind the stainless steel workpiece to make it bright?
The blue wax is an oily substance that is solid at room temperature but becomes liquid when heated.
The wool wheel is driven by a high-speed motor, which rotates it at a high speed.
When the wool wheel is coated with blue wax, it grinds the surface of the workpiece. The oily nature of the wax results in a bright surface on the workpiece.
Thus, it is crucial to choose the right motor for driving the wool wheel during the polishing process.
The motor used for polishing must have a speed of no less than 13000 revolutions per minute (r/min) and a power of no less than 500 watts (W).
If the speed is lower than this requirement, the brightness and mirror effect of the polished workpiece will not be satisfactory.
As a result, ordinary motors typically do not meet these specifications and high-speed motors are commonly used instead.
c. Wool wheels on the market can be divided into coarse wheels and fine wheels.
The selection of the wool wheel is crucial.
While rough wool wheels are easier to polish, fine wool wheels are typically used in actual production for optimal results.
d. In the polishing process, the pressure on the workpiece should also be controlled.
Excessive pressure during the polishing process can cause a large portion of the protective film to be removed by the wool wheel. This can result in discoloration or blackening of the workpiece, damaging its original mirror-like appearance.
e. During the polishing process, it is important to continuously apply a sufficient amount of blue wax. If this is not done, the wool wheel may smoke due to high temperature, leading to significant wear and damage to both the wool wheel and the stainless steel.
f. The small lines that need to be repaired during the lighting stage must be fixed manually, one by one, making the process time-consuming and tedious.
If possible, avoid carrying out any repair work during this stage.
g. Typically, two motors are installed for waxing, with each motor responsible for polishing one side of the workpiece.
It is possible to consider using only one motor for polishing edges to enhance the brightness of the edges.
h. Replace the wool wheel as necessary.
Several supplements on burnish:
a. Burnish:
The burnishing method is similar to the waxing method, but instead of using wax, a cloth wheel is used in the burnishing process.
Burnishing is the final step in the polishing process.
It is important to ensure that the mirror surface is not damaged after polishing, as this will render all previous efforts ineffective.
a. The burnishing process involves attaching a cloth wheel to a high-speed motor, which rotates the wheel at a high speed. The wheel is then used to clean the surface of the workpiece by wiping away dirt and residual wax. This results in a polished surface.
In actual burnishing, it is often done in conjunction with the use of grinding powder. The grinding powder helps to remove the oily substance, such as blue wax, from the workpiece. Its primary purpose is to make it easier to remove the blue wax that has adhered to the surface.
If the burnishing process is not performed with the use of grinding powder, it can be difficult to remove the blue wax from the surface and it may also easily transfer to other areas, affecting the overall appearance.
b. To achieve the mirror-like shine required for the workpiece, it is crucial to maintain the cleanliness of the cloth wheel used in the burnishing process.
In practical production, it may be necessary to replace the cloth wheel depending on the specific circumstances.
As the founder of MachineMFG, I have dedicated over a decade of my career to the metalworking industry. My extensive experience has allowed me to become an expert in the fields of sheet metal fabrication, machining, mechanical engineering, and machine tools for metals. I am constantly thinking, reading, and writing about these subjects, constantly striving to stay at the forefront of my field. Let my knowledge and expertise be an asset to your business.
What makes titanium and stainless steel distinct from each other? While titanium boasts light weight and superior corrosion resistance, stainless steel offers durability and ease of processing. This article breaks…
In this article, we break down the mechanical properties of SUS304 and SUS316 screws, including their tensile strength, yield strength, and torque. Learn how these tiny components withstand immense pressure…
Why do 316L austenitic stainless steel alkali storage tanks crack? Despite being renowned for its durability, 316L steel can develop cracks under specific conditions. This article explores the surprising factors…
Why do stainless steel pipes, celebrated for their durability, sometimes fail under corrosive conditions? This article dives into the root causes of corrosion cracking in stainless steel pipes, focusing on…
What exactly is intergranular corrosion in stainless steel, and why is it so critical to control it? This insidious form of corrosion attacks along the grain boundaries of the metal,…
Ever wondered how the gleaming finish on stainless steel is achieved? This article dives into the meticulous process of mechanical polishing, explaining techniques, tools, and best practices. From rough polishing…
Ever wonder why stainless steel castings crack so easily? This article breaks down the main causes, from poor fluidity to high thermal stress, and offers practical tips to prevent these…
Have you ever wondered how heat treatment can transform the properties of stainless steel? In this insightful article, a seasoned mechanical engineer delves into the fascinating world of stainless steel…
Have you ever wondered how stainless steel achieves that flawless, mirror-like finish? This article dives into the essential techniques for polishing stainless steel, covering everything from mechanical and chemical processing…