Leakage is one of the common faults of mechanical equipment. There are mainly two reasons for causing leakage: firstly, it is caused by machining, and the surface of mechanical products must have defects or shape and size deviations, which inevitably result in clearances at the joints of mechanical parts; secondly, there is a pressure difference between the sealing sides, and the working medium will leak through the clearances.
Reducing or eliminating clearances is the main way to prevent leakage. The function of sealing is to seal the clearances between the mating surfaces, isolate or cut off the leakage channel, increase the resistance in the leakage channel, or add small energy-converting devices in the channel to apply pressure to the leaked material, which can partially offset or completely balance the pressure difference causing the leakage, so as to prevent leakage.
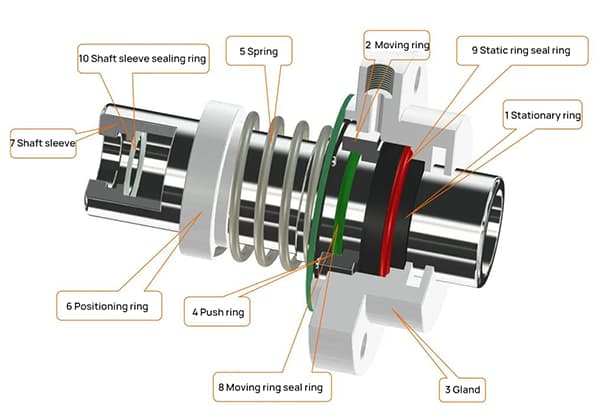
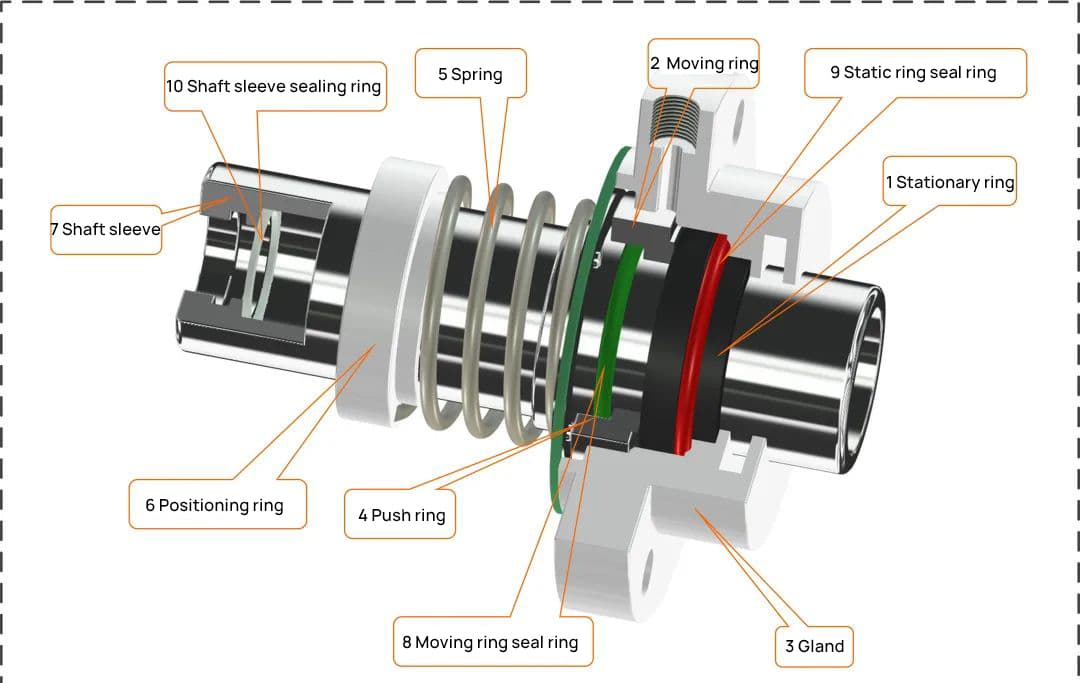
The basic components of a mechanical seal include:
1) stationary ring
2) rotating ring
3) gland
4) collar
5) spring
6) locating ring
7) shaft sleeve
8) O-ring for rotating ring
9) O-ring for stationary ring
The Basic Concept of Mechanical Sealing
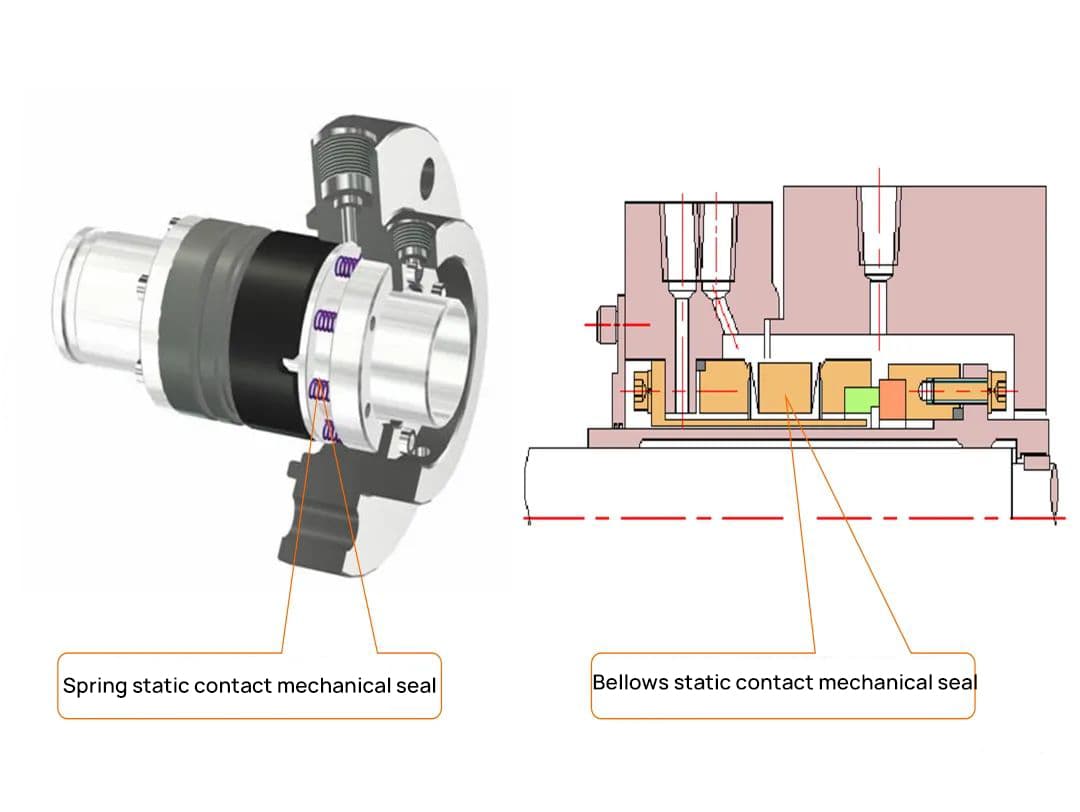
Mechanical sealing refers to a device that prevents fluid leakage, which is composed of at least one pair of end faces perpendicular to the rotating axis and maintained in close contact and relative sliding under the action of fluid pressure and compensation mechanism elasticity (or magnetic force), as well as assisted sealing. The auxiliary seal of the compensating ring is called a bellows mechanical seal.
Components of Mechanical Sealing
The main components of mechanical sealing include the following four parts:
- Main sealing parts: the moving ring and the stationary ring.
- Auxiliary sealing parts: the sealing ring.
- Pressing parts: the spring and the pusher.
- Transmission parts: the drive seat and the key or the fixing screw.
Issues to Be Attentive to During the Operation of Mechanical Sealing
- Notes on installation
a. Pay great attention to avoid installation deviations during the installation process.
(1) The tightening cover should be installed after aligning with the coupling, and the bolts should be evenly tightened to prevent the end face of the cover from deviating. Check each point with a plug gauge, and the error should not exceed 0.05mm.
(2) Check the fit clearance (i.e., concentricity) between the tightening cover and the shaft or shaft sleeve outer diameter, and it should be uniform on all sides. Check each point with a plug gauge, and the allowable deviation should not exceed 0.01mm.
b. The compression amount of the spring should be carried out according to the specified requirements, and oversize or undersize phenomena are not allowed. The error should be within 2.00mm. Oversize will increase end face pressure ratio and speed up end face wear. Undersize will cause insufficient pressure ratio and cannot achieve a sealing effect.
c. After the installation of the moving ring, ensure that it can move flexibly on the shaft. The moving ring should be pressed towards the spring and should automatically rebound.
- Notes on disassembly
a. During the disassembly of mechanical sealing, it should be handled carefully, and hammers and flat chisels are strictly prohibited to prevent damage to sealing components. Two steel wire hooks can be used to insert into the gap of the transmission seat in the positive-negative direction to pull out the sealing device. In case of dismantling difficulties caused by fouling, clean it before disassembly.
b. If mechanical sealing is used on both ends of the pump, take care of both ends during the assembly and disassembly process to prevent neglecting either end.
c. For mechanical sealing that has been in operation, if the tightening cover is loosened, causing the seal to move, the moving and stationary ring parts must be replaced instead of tightening and continued use.
Issues Concerning the Normal Operation and Maintenance of Mechanical Sealing
- Preparation work and precautions before start-up
(1) Conduct a comprehensive inspection of mechanical sealing, accessory devices, and pipeline installation to ensure that they are complete and meet technical requirements.
(2) Before starting up the mechanical sealing, conduct a static pressure test to check whether there is any leakage phenomenon. If there is significant leakage, find out the cause and eliminate it. If it is still ineffective, disassemble and inspect it, and reinstall it. Generally, the static pressure test pressure is 2~3 kg/sq.cm.
(3) Turn the coupling in the direction of the pump, and check if it is free and even. If the coupling is stuck or does not move, check if the assembly size is incorrect or if the installation is reasonable.
- Installation and Shutdown
(1) Before start-up, keep the sealing chamber full of liquid. For conveying solidified media, steam should be used to heat the sealing chamber to melt the media. Before start-up, couplings must be rotated to prevent sudden start-up and soft ring fracture.
(2) For mechanical sealing using the pump external oil sealing system, the oil sealing system should be started first. After stopping the pump, stop the oil sealing system.
(3) After the hot oil pump stops running, the cooling water for the oil sealing chamber and end-face sealing should not be stopped immediately. When the oil temperature at the end-face sealing site drops below 80 degrees, the cooling water can be stopped to prevent damage to sealing parts.
- Operation
(1) If there is slight leakage after the pump starts, observe it for a period. If the leakage does not decrease after running continuously for 4 hours, stop the pump for inspection.
(2) The operation pressure of the pump should be stable, and the pressure fluctuation should not exceed 1 kg/sq.cm.
(3) During operation, it is necessary to avoid cavitation to prevent end-face dry friction and sealing damage.
(4) The sealing condition should be checked regularly. During operation, if the leakage exceeds the standard, the heavy oil should not exceed five drops per minute, and the light oil should not exceed 10 drops per minute. If there is no improvement within 2-3 days, stop the pump and inspect the sealing device.
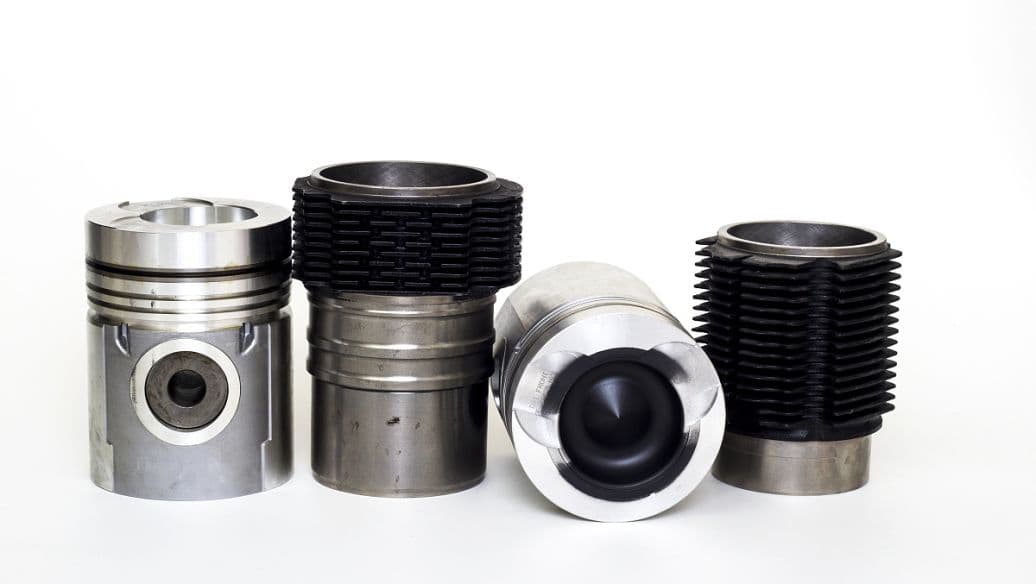
Mechanical Seal Structure and Maintenance
- Structure
The typical structure generally consists of a rotary ring, stationary ring, rotary seal, stationary seal, spring, spring seat, fixing bolts, anti-rotation pin, etc.
- Principle
When the mechanical seal is working, the axial force caused by the pressure of the sealed fluid and the elastic element’s force makes the rotary and stationary rings fit and move relatively.
Due to the two sealing end faces’ tight fit, a small gap between the sealing end faces (the sealing interface) is formed. When the pressure medium passes through this gap, a very thin liquid film is formed, generating resistance, preventing the medium from leaking, and lubricating the end face, achieving long-term sealing effect.
- Classification
(1) According to the sealed host: mechanical seals for pumps, reactors, compressors, etc.;
(2) According to different working parameters, they are divided into high temperature, medium temperature, low temperature, high pressure, medium-pressure, low-pressure, high-speed, heavy-duty, etc.;
(3) According to the structural form, they are divided into balanced and unbalanced, single-end, and double-end mechanical seals.
- Installation
(1) Preparation
① Check whether the radial runout, surface roughness, outer diameter tolerance, and axial displacement of the shaft and sleeve meet the precision requirements;
② Check whether the model and specifications of the mechanical seal meet the requirements. Whether the parts are intact, whether the sealing ring’s size is appropriate, and whether the rotary and stationary rings’ surfaces are smooth and flat. If there are defects, they must be replaced or repaired.
③ Clean the parts of the mechanical seal with clean gasoline and then wipe them dry, paying attention to protecting the sealing surface;
④ When installing the mechanical seal, first find the spring’s working length from the instructions, and then use the caliper to measure the spring’s free length to obtain the compression amount. During installation, the deviation of the spring’s compression amount should be no more than 1mm.
(2) Inspection and Measurement
① The mobility of the rotary ring requires that there be a certain gap between the rotary ring and the shaft, ensuring that the gap is 0.3 to 0.7mm.
② Whether the stationary ring is eccentric. In mechanical seals for pumps, the stationary ring (spring seat) and the shaft adopt a sliding fit, and the gap is very small. If the gap is large, the stationary ring will be eccentric, and the uneven spring force acting on the sealing surface will cause leaks or seal failure.
③ Check the fit between the rotary ring and the stationary ring’s sealing surfaces. When checking, use a 90° square to measure the deviation of the sealing surface from the shaft’s centerline.
(3) Installation
First, assemble the components in the rotating component and the stationary ring component, and preliminarily preload the spring. Then, install the rotary ring component on the shaft and the stationary ring component in the pressure cover. First, measure the distance from the rotary ring’s sealing end face to the sealing cavity’s end face and the distance from the stationary ring’s sealing face to the end cover’s end face. The difference between the two is the mechanical seal’s spring preload amount, and the bearing is assembled. The compression amount is adjusted according to the technical requirements and the measured compression amount, and the pressure cover is tightened.
During the installation process, maintain the seal’s cleanliness and integrity and do not use tools to tap the sealing components to avoid seal damage. After the mechanical seal is installed on the shaft, push the rotary ring by hand to feel elastic and smooth, then add some engine oil to the sealing surface, and evenly tighten the end cover without pressing it off.
(4) Inspection and Pressure Testing
After installation, the rotary should operate flexibly and have a certain degree of flexibility. Mechanical seals for important equipment must undergo static and dynamic pressure tests. After passing the test, they can be put into formal use.
- Operation
(1) Precautions before starting up: Check whether the auxiliary equipment and cooling system are installed correctly; clean the pipeline to prevent rust and impurities from entering the sealing cavity; rotate the coupling by hand to check whether the shaft operates smoothly. If it is very heavy, check whether the mating dimensions are correct and find out the cause and eliminate the fault.
(2) Trial operation and normal operation: First, start the liquid sealing system and the cooling water system to fill the sealing cavity with the medium, and then start the main seal for trial operation. If a slight leakage is found at the beginning but gradually decreases after 1-3 hours, this is a normal running-in process. If the leakage does not decrease, stop for inspection; If the mechanical seal overheats or smokes, it is usually due to excessive spring pressure, and the spring pressure should be appropriately reduced. After the trial run is qualified, it can be put into normal operation under working conditions. The temperature and pressure rise process should be slow, and closely observe whether abnormal phenomena occur.
- Shutdown
Stop the main engine first, followed by auxiliary systems and cooling water systems. If the stop time is long, empty the medium in the main engine.
- Maintenance
(1) Pay attention to whether the mechanical seal components themselves are loose and leaking or heat generation and abnormal sounds due to impurities entering the sealing end face; prevent dry friction; for intermittently operated machinery, pay attention to the crystallization formed by the dry medium or temperature reduction during shutdown. When starting up, take measures such as heating or flushing to prevent end face scratches.
(2) Observe whether the auxiliary devices and instruments, such as flushing and cooling, are working properly;
(3) Pay attention to whether there are abnormal phenomena during machine operation, such as vibration or bearing damage, which will affect the use of the mechanical seal.
- Overhaul
(1) Requirements for disassembly work:
① Be familiar with the relevant data, drawings, and types and structures of mechanical seals before disassembly;
② Do a good job of preparation and prepare necessary facilities and tools, and do a good job of safety protection;
③ Disassemble in order and mark it for easy reassembly; observe while disassembling and analyze and find the cause of the leak;
④ After disassembling the old parts, they should be stored for a period before processing. When there are no data or incomplete data, new parts can be obtained according to the old part’s material and specifications.
(2) Overhaul method:
① When severe wear or cracking occurs on the rotary and stationary ring surfaces, replace them with new ones. Slight scratches can be ground; check the deviation of the end faces of the rotary and stationary rings’ end faces from the shaft’s centerline. If it exceeds 0.05mm, it should be adjusted or repaired;
② When the auxiliary seal rings and springs are damaged, replace them with new ones; when selecting springs, select ones that are parallel to the end face and perpendicular to the centerline, with consistent free height and deformation;
③ Adjust the axial displacement to the specified range;
④ Check whether the shaft or sleeve is worn. If there is wear, timely repair welding, heat treatment, and machining.