The large volume, new materials, and spacious design of installed air ducts can make them susceptible to deformation and cracking. This can lead to incomplete connections and air leakage, ultimately impacting the effectiveness of air conditioning systems.
To ensure the quality of production and installation of large-volume air conditioning ducts, the following aspects should be considered:
I. Entry materials
The design of air conditioning ducts should meet specific requirements for optimal performance, such as a flexural strength greater than 1.8 MPa, a thickness of 2.6 mm for heat-insulated ducts, and a thickness of 1.8 mm for non-insulated ducts.
To ensure the quality of the construction materials, it’s important to confirm the chosen brand with both the supervisor and owner. Additionally, the selected brand must have a good reputation and high performance standards.
When receiving incoming materials, strict inspections must be conducted in accordance with the material purchase inspection procedures. This is to ensure that the materials used meet acceptable quality standards and provide reliable performance.
Before cutting the sheet, line it up properly.
The basic types of lines include right-angle lines, perpendicular bisectors, parallel lines, angular bisectors, straight bisectors, circle bisectors, etc.
The unfolding method should employ the parallel line method, radiation method, and triangle line method.
Depending on the geometric shapes and specifications of the design drawings and large-scale drawings, the lines should be unrolled separately.
Check the sheet for cutting before cutting to avoid mistakes, and use a handheld cutter to cut according to the scribe’s shape.
Do not put your hands in the gap of the mechanical platen while cutting.
Do not place any tools or other items on the upper knife holder.
When adjusting the sheet, do not put your feet on the pedal.
When using a fixed vibration shear, hold the steel plate with both hands and keep your hands at least 5cm away from the knife edge.
Make sure to apply even force while using the shear.
The cutting line should be straight, and the diagonal length error of the duct board should be less than 0.5mm.
The step line should have a depth of 18-21mm, and the cutting line must be at a 90° angle to the board surface, creating conditions for the splicing of the duct angle to 90°.
The straight pipe section of the rectangular duct must be accurate, and the corner line should be straight.
The four end lines of each port of each section of air duct (including tees, elbows, etc.) should be on the same vertical plane as the centerline of the pipe.
Number the cut boards so that they can be easily assembled.
Ⅲ. Duct Assembly
Based on the design requirements, the project department has set up a small duct processing workshop on-site to ensure the construction quality and facilitate the owner’s site supervision and inspection.
1. Preparation of special glue
The special glue used for assembling air ducts has several characteristics, including high bonding strength, non-flammability, water-resistance, ease of construction, and good adhesion to air duct materials.
This particular glue consists of both powder and liquid components, with a weight ratio of 10:9 between the two.
To ensure optimal consistency, the glue should not be too dry or too thin; it is recommended to have a slight fluidity. An electric mixer can be used to thoroughly mix the components.
2. Assembly process (straight pipe)
2.1 Start by using a knife to cleanly cut off the step-shaped thermal insulation layer of the side panel, ensuring that the step position is flat.
2.2 Apply special glue evenly and fully to the side panel steps. It is recommended to squeeze a small amount of residual slurry when the upper and lower plates are joined.
2.3 To assemble the air duct, follow these steps:
- First, place the bottom panel on the group stand.
- Second, insert the left and right panels on the edge of the bottom panel, offsetting them 100mm from the length of the upper and lower panels. Then, insert the upper panel between the left and right panels.
- Third, tightly bundle the freshly assembled air ducts with a strapping band. The spacing between strapping bands is usually around 600mm.
- Protect the four corners with angle steel that has been coated with mold release oil in advance. The mold release oil is made of 1kg of saponified oil, 5kg of water, and a small amount of diesel oil.
- For air ducts with a continuous length of the straight section greater than 15m, set an expansion joint to account for changes due to wet expansion and dry shrinkage.
2.4 Ensure that the inner angle of the four bundled air ducts is 90° and in the correct position to prevent deformation that can affect the splicing quality. Remove any excess glue that has been extruded and fill any gaps.
2.5 Remove the strapping carefully and remove any residual slurry from the splicing seam, depending on the solidified state of the glue. If the glue has solidified too hard, it may be difficult to remove any excess slurry, and if it hasn’t cured enough, the air duct may shake, affecting the splicing strength.
To prevent these issues, it’s important to remove the strapping as soon as the glue has reached its initial setting strength and remove any residual slurry while strictly controlling any shaking of the air duct. Generally, the air duct should be kept at an ambient temperature of 10°C-20°C for 24 hours, above 0°C for 48 hours, and below 0°C for 72 hours to allow for proper solidification.
However, during winter construction when time is tight, relying on ambient temperature alone to promote solidification may not be feasible. To speed up the solidification process, we recommend using centralized stacking and heating to promote coagulation.
To do this, gather the air ducts to be spliced in a room and close all doors and windows. Set up two electric heaters in the room and turn them on 24 hours a day to increase the indoor temperature. Through this method, the temperature can be raised from -2°C to 11°C, reducing the solidification time of the air duct from 72 hours to 24 hours, and creating conditions for ensuring the construction period.
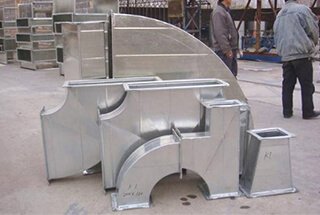
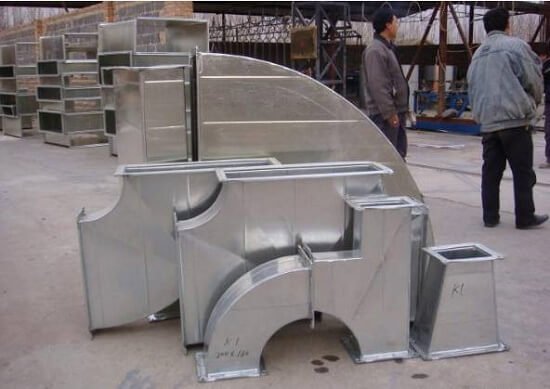
Attachment production of the same cross section
Begin by cutting the duct plate to the appropriate size according to the drawing, and then cut 45-degree diversion angles along the wind direction.
When folding the elbows and three heads in half, use the internal extrusion method instead of the external opening method. This means cutting a V-shaped seam on the inside of the sheet when folding it in half.
Remove the middle foam and apply the appropriate proportion of glue before folding the sheet in half. In the case of half-folding, it’s best to squeeze out a little extra glue.
Cut the side panel into a step shape, apply special glue to the step position, and then fix it by binding. Clean up any remaining glue, fill any gaps, and allow the assembly to solidify in a flat location.
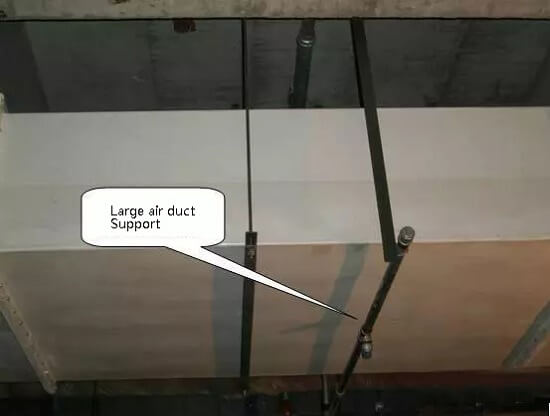
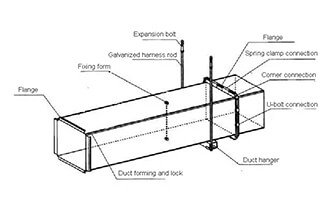
Ⅳ. Duct Hoisting
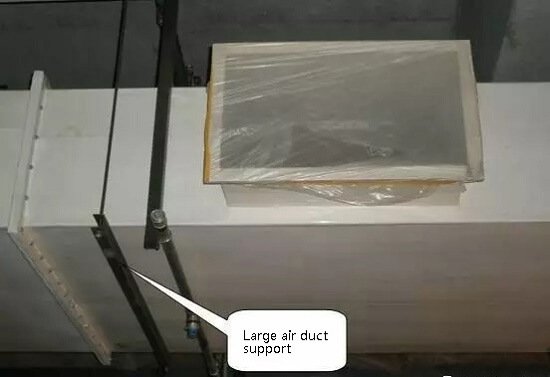
Setting of duct hangers and supports
To ensure the stability of large-volume air ducts, the distance between booms should not exceed 2.0m.
The booms are made of 50×50×5mm angle steel, the hangers are made of Ф10 round steel, and expansion bolts are used to fix them to the load-bearing structure.
Strengthening measures for large-volume air ducts
The production and installation process of large-volume air ducts now includes reinforcement to increase their strength.
If the long side of the air duct measures 800mm or greater but less than 1250mm, reinforcing strips measuring 25x40mm are affixed to the four corners of the inside of the air ducts. These strips should be as long as the air ducts and applied with dense and seamless glue.
When the long side of the air duct is greater than 1250mm, a reinforcing rib is used. This involves connecting a support column between the upper and lower plates of the air ducts. The support column is secured to the air ducts’ upper and lower plates using a Ф10 screw and nuts.
To ensure stability, an 80x80x5mm silicon-magnesium plate is used as a gasket on the inside and outside of the upper and lower plates. A plastic insulation cover is then applied externally.
The distance between the ribs should be no more than 1.5m.
Hoisting
The air ducts should not be hoisted until they have fully solidified. The hoisted ducts can be connected to a certain length on the ground and then hoisted in place. However, the length should not be more than 10m, as it can cause fracture if it is too long.
To hoist the air duct, a chain block or pulley can be used. The following hoisting steps should be taken:
First, select two reliable hoisting points on the beam-columns according to the specific conditions of the site, and then hang the chain block or pulley.
Next, use a hemp rope to tie the air duct firmly. Usually, two ties are tied at 1/4 from both ends. It is important not to directly tie the rope to the air duct. Instead, a cushion of soft material should be provided where the hemp rope contacts the corner of the duct to prevent deformation.
During hoisting, it is strictly forbidden for people to be under the hoisted air duct and to stand on the air duct. When the air duct is 200-300mm above the ground, hoisting should be stopped to carefully check the stress point of the chain block or pulley and the rope that binds the air duct. Check whether the buckle is secure and the center of gravity of the air duct is correct. If everything is in order, continue hoisting.
For longer ducts, hoisting speed should be carried out synchronously to prevent deformation of the duct due to excessive pressure on the middle duct.
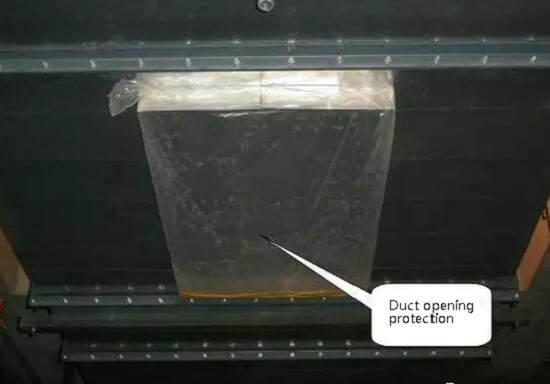
When hoisting the air duct to the height of the scaffold, the overhanging part of the scaffold should be wrapped to prevent the air duct from being punctured during hoisting. This can cause damage to the protective layer, heat insulation layer, and even air leakage.
After placing the air duct on the support and hanger, connect all the trays and booms, and ensure that the air duct is stable before unlocking the rope.
The hoisted air ducts should be spliced promptly, taking care not to shake them too much during splicing. When working on the air duct, avoid stepping on it directly with feet. Instead, use two wooden boards of approximately 1000 × 200mm to pad the feet and alternate between them to increase the stress area and ensure safety.
After splicing, promptly clean any remaining glue when it solidifies, check for gaps, and fill the glue in time. Once the glue is completely solidified, inspect the duct with the supervision unit, and after approval, affix the aluminum foil tape.
Pay attention to protecting the finished product after construction. Place a “Please pay attention to finished product protection” label in a visible location, and regularly inspect and maintain it with workers.