Laser Cutting Nozzle Selection: Cutting-Edge Tips
Have you ever struggled with choosing the right laser cutting nozzle for your project? Selecting the optimal nozzle is crucial for achieving clean, precise cuts and maximizing efficiency. In this…
Ever wondered how to achieve precise cuts on thick stainless steel plates using lasers? This article dives into the essential debugging methods and skills needed for optimal laser cutting performance. From selecting the right nozzle and adjusting frequency to fine-tuning the duty ratio and focus, you’ll learn key techniques to enhance cutting quality and efficiency. Unlock the secrets behind perfect laser cuts and elevate your metalworking projects with these expert tips.
Stainless steel plates are a popular material among users in various industries. Products manufactured using stainless steel plates exhibit excellent performance and have a relatively long service life. This makes them widely used in machinery manufacturing, construction engineering, kitchenware manufacturing, rail vehicles, and other industries.
Currently, most manufacturers opt for laser cutting when it comes to stainless steel plates. However, cutting high-quality thick plates of stainless steel requires certain skills.
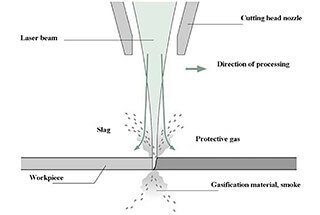
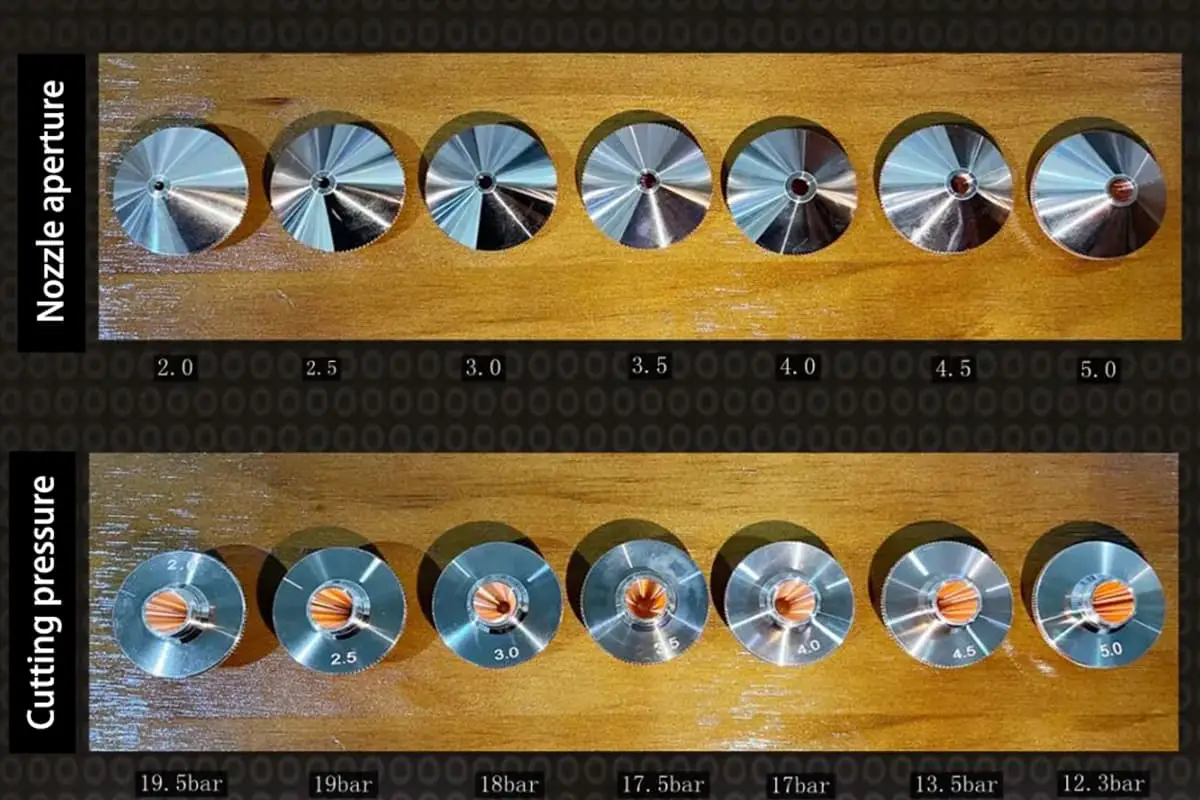
The diameter of the nozzle determines the shape of the airflow into the incision, the area of gas diffusion, and the gas flow rate. These factors can affect both the removal of melted material and the stability of the cutting process.
A larger airflow into the incision can result in faster speeds, and when combined with appropriate positioning of the workpiece within the airflow, can enhance the ability of the jet to remove molten material.
For thicker stainless steel, a larger nozzle diameter and higher air pressure setting are recommended. It is important to ensure that the pressure and flow rate are balanced in order to achieve a normal cross-section cut.

Note: Air Pressure at a Fixed Flow Rate and Different Nozzle Sizes
When cutting thicker stainless steel, a larger nozzle size should be used, along with a larger proportional valve setting and flow rate to maintain the required pressure and achieve a normal cross-sectional effect.
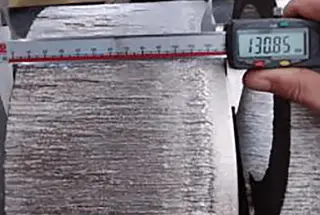
To ensure the cutting effect and protect the nozzle from damage, a coaxial test is necessary before the cutting process. This involves testing the alignment of the nozzle and the laser output beam to ensure they are coaxial.
Here’s a suggested test method: tape a transparent paper to the nozzle outlet end surface, adjust the laser output power for punching, observe whether there is a center hole on the transparent tape paper and the position of the center hole, and simultaneously adjust the adjustment screw on the mirror cavity handle until the laser punched hole on the transparent tape paper coincides with the center of the nozzle.

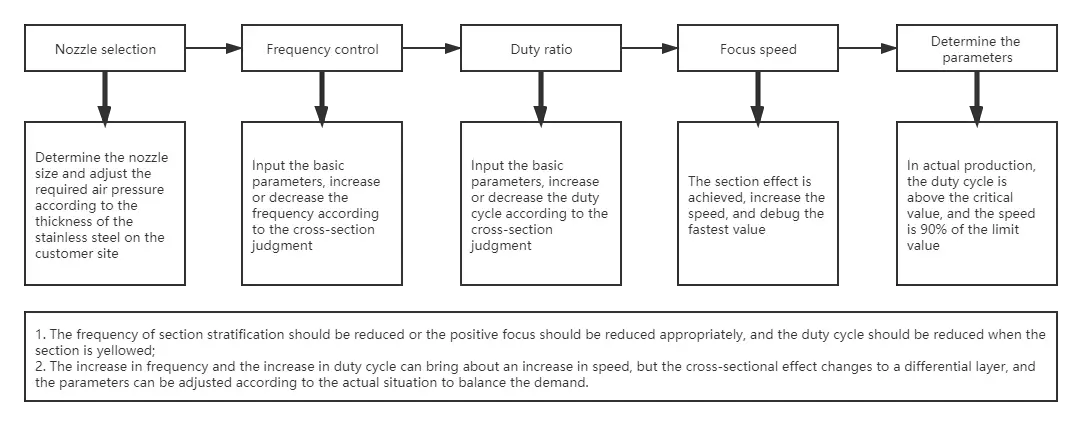
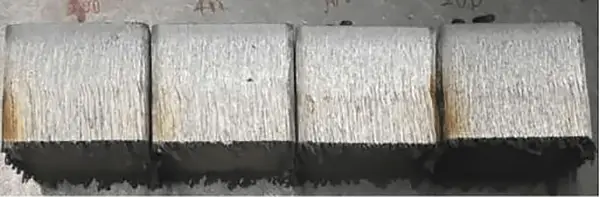
The effect of frequency change on the cutting of stainless steel plate: when the frequency decreases from 500 to 200Hz, the cutting cross-sectional effect becomes finer and layering slowly improves. However, if the frequency is set to 100Hz, the material cannot be cut and becomes anti-blue light.
By changing the frequency, it is possible to identify the optimal frequency range for cutting.
To ensure the best cutting cross-section, it is essential to ensure that the number of pulses and single pulse energy are perfectly matched.
| Frequency | 500 HZ | 400 HZ | 300 HZ | 200 HZ |
| Duty ratio | 55% | 55% | 55% | 55% |
When cutting stainless steel plates, it’s crucial to adjust the duty ratio properly. A duty ratio of 53% is considered the critical value. If the duty ratio is decreased beyond this point, uncut marks may appear on the lower surface, the section may become rough, and delamination may occur. On the other hand, increasing the duty ratio to 60% can result in the cut surface becoming yellow.
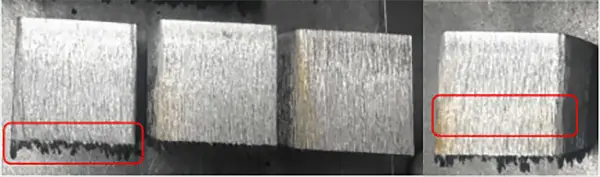
| Frequency | 200 HZ | 200 HZ | 200 HZ | 200 HZ |
| Duty ratio | 52% | 53% | 55% | 60% |
The thickness, material, and quality of the cut can vary based on the chosen focus.
It is necessary to adjust the focus according to the material and thickness being cut.
To determine the optimal cutting focus quickly, it is recommended to measure the actual zero focus before cutting and then refer only to the cutting process parameters.
| Frequency | 200 HZ | 200 HZ | 200 HZ | 200 HZ |
| Duty ratio | 52% | 53% | 55% | 60% |
Note: The above method is for parameter debugging, but the specific value needs to be determined based on the power of the laser and the thickness of the plates.


As the founder of MachineMFG, I have dedicated over a decade of my career to the metalworking industry. My extensive experience has allowed me to become an expert in the fields of sheet metal fabrication, machining, mechanical engineering, and machine tools for metals. I am constantly thinking, reading, and writing about these subjects, constantly striving to stay at the forefront of my field. Let my knowledge and expertise be an asset to your business.