Laser Cutting Nozzle Selection: Cutting-Edge Tips
Have you ever struggled with choosing the right laser cutting nozzle for your project? Selecting the optimal nozzle is crucial for achieving clean, precise cuts and maximizing efficiency. In this…
Imagine the catastrophic consequences of neglecting laser cutting machine maintenance. Don’t let your business fall victim to costly downtime and repairs! In this blog post, we’ll dive into the essential daily, weekly, and irregular maintenance tasks that will keep your laser cutter running smoothly. Our expert mechanical engineer will guide you through the critical steps to ensure optimal performance and longevity. Get ready to master the art of laser cutting machine maintenance!

Before starting the machine each day, carefully check the working gas and cutting gas pressure of the laser. If the gas pressure is inadequate, it must be replaced promptly.
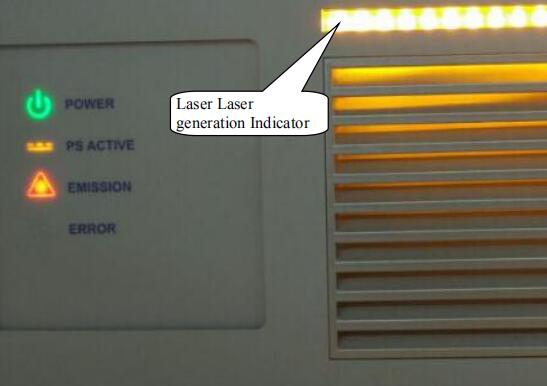
Check the X-axis zero point, Y-axis zero point, Z-axis zero point, laser readiness status, and other buttons for damage (verify the indicator light).
Verify that the mounting screws for the X-axis, Y-axis, and Z-axis zero points, limit switch, and mounting blocks are tightened and that the limit switches for each axis are responsive.
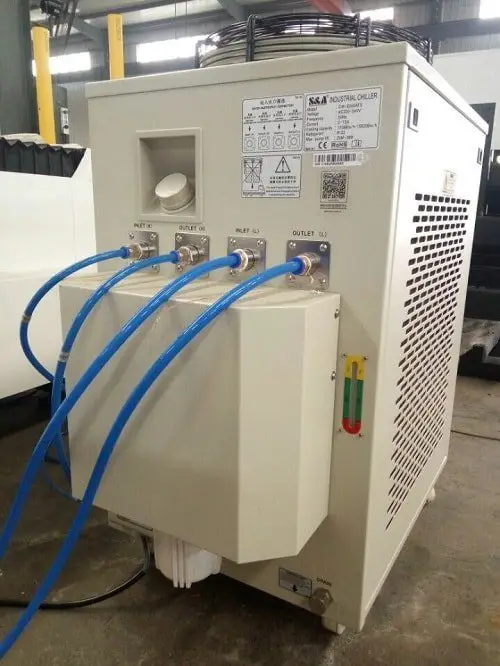
Ensure that the circulating water level in the chiller is adequate. If the water level is insufficient, add water promptly.
Check the external optical path’s circulating waterway for leaks, and promptly address any leaks; otherwise, the optical lens’s lifespan may be affected.
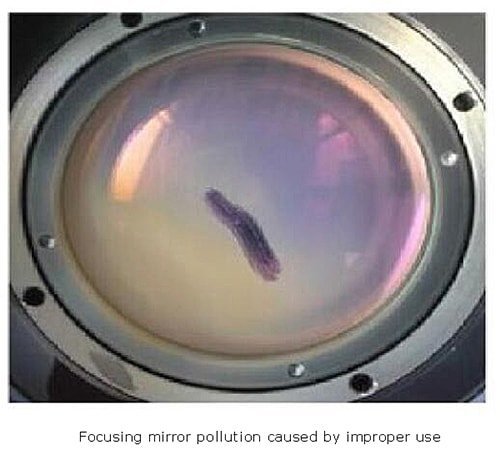
After each day of cutting, inspect the focus lens for damage.
Inspect the external light path’s telescopic skin cavity for burns or damage.
After completing daily work, promptly clean up the cutting waste, clear the work area, and keep it tidy. Also, ensure that all equipment parts are clean and free of dirt, and avoid placing debris on any equipment part.
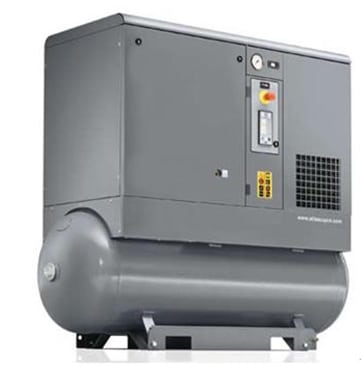
After daily work is done, open the air compressor’s drain valve at the bottom of the air tank to drain the water. Close the drain valve once the waste water has drained.
After completing daily work, follow the shutdown procedure, and turn off the main power supply of the entire machine.
It is essential to regularly clean the debris from the air outlet to ensure proper ventilation.
Check the filters in the gas path regularly to promptly remove any water and debris.
Ensure that the screws of the travel switch bracket and the bumper bracket are not loose by checking them regularly.
To facilitate the heat dissipation of internal electrical components, clean the dust from the filter screen of the electric control cabinet ventilation fan in a timely manner.
Cleaning the protective skin cavity of the guide rail on time is necessary to prevent damage to the guide rail, thereby extending its service life.
After installing the machine tool and using it for a period, it is vital to readjust the level of the machine tool to ensure its cutting accuracy.
Check the lubrication filling of the X, Y, Z axis guides, and lead screws every other week to keep the moving parts lubricated. This can extend the service life of X, Y, Z axis guides and their lead screws.
Depending on the environment of the workshop, it is important to irregularly (at least once a month) check the pollution on the surface of the reflector and focusing lens and clean the optical lens in time to ensure its service life.
Avoid touching the surface of the optical lens (reflector, focusing lens, etc.) directly with your hands, as this can easily cause scratches on the mirror. If there are oil stains or dust on the mirror surface, clean it promptly to avoid affecting the lens’ performance.
Under no circumstances should the optical lens be cleaned with water and detergent as the lens’ surface is plated with a special film. Using water and detergent to clean the lens can damage its surface.
Keep the lens away from dark and humid environments as this can cause the lens surface to age.
Dust, dirt, or water vapor on the lens surface can easily absorb laser light and damage the lens coating, which can significantly affect the quality of the laser beam, and in severe cases, there would be no laser beam at all.
If the lens is damaged, contact the laser after-sales service department immediately to repair it. Avoid using the damaged lens, as this can accelerate the damage of the repairable lens.
When installing or replacing the reflector or focusing lens, avoid using excessive pressure, as it can cause deformation of the lens and affect the quality of the beam.
Please pay attention before installing optical lenses:
(1) Please wear clean clothes, wash your hands with soap or detergent, and wear clean and light-colored gloves;
(2) Do not touch the lens with any part of your hands;
(3) When removing the lens, please wear gloves and hold it from the side of the lens. Do not touch the lens coating surface directly.
When assembling the lens, avoid blowing air against the lens with your mouth. Instead, place the lens on a clean desktop with a few sheets of lens paper underneath. Take care when removing the lens to prevent it from getting scratched or falling, and do not apply any force on the coated surface of the lens. Ensure that the lens holder on which the lens is installed is clean, and remove any dust or dirt in the holder with a clean air spray gun. Then, gently place the lens in the holder.
When mounting the lens to the holder, do not use excessive force to fix the lens, as this may cause deformation and affect the quality of the beam.
Precautions to take when replacing optical lenses:
Different lenses require different cleaning methods. For flat mirror surfaces without a lens holder, use lens paper to clean, such as when cleaning a reflector. However, for curved mirror surfaces or those with a lens holder, it is best to use a cotton swab, such as when cleaning a focusing lens.
Steps for cleaning a lens with lens paper:
(1) Use a blower to blow off any dust on the lens surface.
(2) Clean the lens surface with alcohol or lens paper. Do not use dry lens paper to directly drag it across the mirror surface. Instead, place the lens paper on the surface of the lens, add 2-3 drops of high-purity alcohol or high-purity acetone, and slowly pull the lens paper out towards the operator. Repeat this process several times until the mirror surface is clean.
(3) If the mirror surface is very dirty, fold the lens paper in half 2 to 3 times and repeat the above steps until the mirror surface is clean.
Steps to Clean a Lens with a Cotton Swab:
Before switching on the laser, it is important to perform daily maintenance checks to ensure optimal performance.
Regular maintenance is essential for the chiller to ensure it operates efficiently. In case of any malfunction, it is imperative to seek the assistance of a professional technician for repair. It is strictly prohibited to disassemble the machine by oneself.
Here are some important aspects to consider during daily maintenance of the chiller:
The steps for daily inspection and cleaning of a laser cutting machine include the following aspects:
Daily maintenance of the laser:
Before starting each day, maintenance of the laser is required, including checking the cylinders of the laser working gas and cutting gas, ensuring the cooling water pressure is maintained between 3.5 to 5 bar, verifying the temperature of the cooling water meets the requirements of the selected laser, inspecting the oil level in the laser vacuum pump, and checking for leaks in the laser’s oil, water, and gas lines, as well as in the vacuum pump, the pneumatic components of the resonator, and the pipe joints.
Cleaning of the lenses:
For the lenses of the laser cutting machine, particularly the focusing lens and the reflective lens, it is recommended to clean the focusing lens after each day’s use, and to clean the reflective lens and the laser beam combiner lens at least once a week.
The correct cleaning method includes blowing off surface particulates from the original parts with a blower balloon, gently cleaning the lens with analytically pure acetone, and if the acetone cannot remove all dirt, vinegar can be used for cleaning. When contaminants and lens damage cannot be cleared and removed, replacing the lens is the only way to restore optimal performance.
Inspection of other parts of the machine:
Before starting the machine, it is also necessary to carefully inspect the entire bed, check the cleanliness of the lenses, perform coaxial debugging of the laser cutting machine, and check the status of the chiller.
Additionally, after the completion of daily work, the drain valve at the bottom of the air compressor’s gas storage tank should be opened for drainage, the drain valve should be closed after wastewater is discharged, and the machine should be shut down following the shutdown procedure, then the total power of the entire machine should be turned off.
Cleaning of the guide rails and linear axes:
It is recommended to clean the guide rails and linear axes once every half month, which should be done when the machine is turned off.
To properly maintain the tracks and guide rails of a laser cutting machine and ensure their straightness and verticality, the following steps and precautions should be followed:
Regular inspection:
First, it’s essential to regularly check whether the X, Y, and Z axes of the machine tool can return to the origin, and whether the steel belt remains under tension. This helps to identify and resolve any issues that may cause deviations in straightness and verticality promptly.
Use of professional tools:
For straightness error detection of guide rails, an optical collimator can be used to detect the straightness error of the guide rail in the vertical and horizontal planes. Although this method is highly accurate, it is complex to set up and adjust, so it’s advisable to have a professional measurement personnel operate it.
In addition, tools such as adjustment screws, magnetic adjusters, and laser measuring instruments can be used to adjust parameters such as the installation position, parallelism, and verticality of the guide rail.
Calibration process:
When adjusting the angle of the linear guide rail, the adjusted guide rail should be based on the guide rail that has been rectified to minimize the least squares error between the adjusted guide rail and the base guide rail.
During the calibration process, actual parameters of the guide rail should be measured and recorded for subsequent precise adjustments.
Maintenance and debugging:
If any abnormality is found in the straightness of the track or the verticality of the machine during the inspection process, timely maintenance and debugging should be carried out.
Comprehensive use of multiple measurement methods:
To obtain a comprehensive straightness characteristic, equipment with high measurement resolution, such as the Swiss RAYTEC laser collimator, can be used. It can capture the offsets in both the X and Y directions simultaneously.
The best practices for managing the cooling system and water tank of a laser cutting machine include the following points:
Regularly clean the water tank and replace the circulating water:
To maintain the normal operation of the laser cutting machine and extend its service life, it is necessary to regularly clean the water tank and replace the circulating water.
Specific operations include turning off the power, unplugging the water inlet pipe, letting the water in the laser tube automatically flow into the water tank, then opening the water tank to take out the water pump, removing the dirt on the water pump, and replacing the circulating water after cleaning the water tank.
Use a closed-loop cooling system with a dual temperature control system:
To maintain the optimal performance of the fiber laser cutting machine, a closed-loop cooling system with a dual temperature control system can be adopted, which performs excellently in keeping the fiber laser cutting machine cool.
Pay attention to the ion exchange column in the cooling system:
During long-term use, you should always observe the state of the ion exchange column in the cooling system to ensure the effective operation of the cooling system.
Winter maintenance:
In the event of a strong cold wave or long-term non-use of the laser cutting machine, attention should be paid to the overcurrent components in the cooling system to ensure that the equipment can perform optimally even in harsh cold environments.
Empty the cooling water:
Before shutting down the laser cutting machine, you should actively empty the cooling water with the water chiller to avoid problems caused by the freezing of water.
The methods and cycles for maintaining the laser head and lens of the laser cutting machine mainly include the following points:
Installation method of the fiber head:
It should be operated in a clean environment, and the fiber head should be installed horizontally into the cutting head and locked to avoid dust rising. The correct installation method can slow down lens aging and minimize lens wear.
Check before daily use:
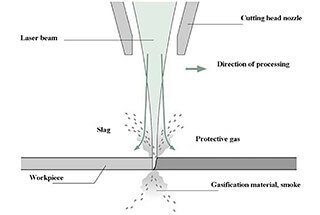
Check whether the laser is emitted from the center of the nozzle to ensure the normal output and cutting accuracy of the laser.
Maintenance cycle:
The lens should be cleaned daily to maintain the cleanliness and good working condition of the optical lens.
In addition, for the replacement of cooling water and the cleaning of the water tank, it is recommended to do it once every six months or before replacing equipment that has not been used for a long time.
The special maintenance measures for the laser cutting machine in special seasons like summer mainly include the following points:
Check and maintain the cooling system:
Due to the increase in temperature in summer, the working pressure of the cooling system of the laser cutting machine increases. It is recommended to check the internal pressure of the cooler before the heat arrives and consult the equipment manufacturer for specific parameters.
In addition, the chiller should be checked and maintained regularly to prevent the laser from condensing in the summer.
Use regular distilled water or pure water:
In summer, due to the higher temperature, the deterioration speed of the cooling water will also accelerate, so it is recommended to use regular distilled water or pure water, and clean the scale regularly to avoid laser power being affected by the scale attached inside the laser and the pipeline.
Replace and clean the cooling water:
It is recommended that customers clean the water tank scale, replace the water and filter regularly, especially in summer, to keep the cooling system clean and efficient.
Prevent the laser from condensing:
In order to prevent the core component of the laser cutting machine – the laser from condensing, the water temperature of the chiller can be set to 28℃, and ensure the independent space environment where the laser is placed is below 35℃, and the environment humidity is below 60℃.

As the founder of MachineMFG, I have dedicated over a decade of my career to the metalworking industry. My extensive experience has allowed me to become an expert in the fields of sheet metal fabrication, machining, mechanical engineering, and machine tools for metals. I am constantly thinking, reading, and writing about these subjects, constantly striving to stay at the forefront of my field. Let my knowledge and expertise be an asset to your business.